
It’s useful to spend some time making little beats (Li’l beats) and getting your core music production skills locked in. I recently spent a week or so and made 51 quick beats to explore different BPMs and work on finding nice grooves that I like. I created beats in every BPM between 90 and 140 and followed the following quick recipe to focus:
- Create a template that has 2 midi tracks
- One for drums midi – use a drum rack that has the kick, snare, hat, crash, shaker, perc and so forth in the same position
- One for sub/bass midi that has a sidechain from the kick position in your drum rack
- Pick a BPM
- Select a DRUM kit
- Create a 4-bar kick/snare pattern
- Add a hat / perc / crash to the pattern
- Mix the drum so the kick/snare are roughly the same volume and the hat / perc are not standing out in the mix like a weirdo.
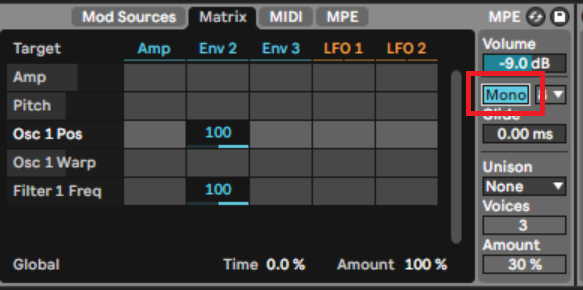
- Pick an instrument and sound design a sub that follows the kick rhythm making sure that the sub is set to MONO because poly basses aren’t the move for this exercise.
- Pick an instrument and sound design a bass that sits on top of the sub pattern – it is faster to duplicate your sub instrument in an instrument rack and synthesize after you’re already calibrated to it
- Create a macro or other automation to add movement to the bass and sub and find points in the 4,8, and 16 bar cycles to emphasize moments.
- Mix your basses in with the kick/snare volume levels so no elements overlap egregiously – it can help to tweak your sidechain to force musical space.
This simplified recipe covers mixing, drum pattern design, and sound design and should only take you 20 minutes or so per beat after you have put together a few of them. I’ll share a few tips for each step of the process.
Because the exercise is so simple, you will have an opportunity to deeply explore your instruments and should focus on the fundamentals of sound design instead of worrying about making a song. While making the beats I saved some of the best bits into my library (a nice kick midi loop, bass patches, etc) so that I have some fresh ideas that I can reach for when I’m seeking inspiration – if you don’t know already, you can drag from the right pane of Ableton into the left pane to organize and save your work.
Creative and aesthetic ideas
While you’re making beats, it’s easy to feel like you’re making shitty beats. Try these ideas to see if it makes you feel better.
Turning on the metronome can help you find the groove.
- When you’re composing the beat, pay extra super-duper special attention to the cycle of 4, 8, and 16 bars, these are moments where adding a change-up will really drive the beat forward.
- If you’re bored, your listener is bored. Add a modulation at moments where a change feels like the right thing to do.
- It’s a quick beat so focus on the entire thing being an escalation – take away from the beat in earlier bars to save some energy for the end.
- Try shorter and longer drum midi, sometimes there’s a nice tail that fits and sometimes the tails are ruining your vibe.
- Pay attention to the negative space in your beat – those moments of silence really add to the groove
- Sometimes it’s helpful to try and constrain how many channels you use and just have one midi channel for sub/bass. Other times you should try using two sets of bass channels and use one as a call and the other as a response.
- Try starting from different elements – bass vs kick vs snare vs hats.
- Triplet grooves (control+3 in Ableton) sometimes will really swing the beat in a good way.
- One easy progression is to use a clap in the first 4-16 bars of the beat in the position of the snare, then replace it with the snare later on.
- Another easy progression in tops is to find a groove with a hat, replace it with a shaker, replace it with a perc, and explore where each sound will drive things better or keep the beat interesting.
- Always be moving the kicks around but never the snares. Moving the snares messes up the groove but moving the kicks seems to really help the groove.
- Try switching between non-linear and linear drumming patterns. This just means eliminating overlapping drum midi – sometimes it is nice to have the layered transient of a hat and kick and other times it is much better to have separate clean sounds on their own.
- Try different flavors of sidechain – sometimes you want that Live 8 compressor and other times you want a Gatekeeper and other times you want a Nicky Romero Kick Start and you just don’t know it yet.
Bass synthesis tips
- If you can’t figure out what to do with the sub, pick a note between D, E, F, G, A and match your sub notes to the kick
- Try making a pluck bass by mapping an envelope on the filter cutoff, volume, or amp. If you’re feeling saucy, you can use a second inverted phase oscillator to modulate a pluck bass as well.
- Try adding syncopation to the bass by mapping a step/ladder LFO to the cutoff – in Serum you can hold down shift and click on the LFO and you will quickly get these nice horizontal steps.
- If you’re using a wavetable synthesizer, try swapping out the wavetable and oscillating the wavetable with a step LFO, it’s an easy way to quickly explore a variety of sounds – by changing the rate you can tweak how long one wavetable is oscillating your bass note.
- Try making your bass wet or squishy by using a vocoder with an enhance modulator.
- Try a gate / trance gate to get some articulation as an alternative to an arpeggiator.
- Low pass filter is great but so can a formant EQ, try different shapes and moving around your cutoffs.
- Get used to experimenting with different stages in your synthesis, moving around devices and effects makes a big difference.
- Explore every flavor of distortion in your arsenal, Ableton has Overdrive, Redux, Pedal, Vinyl Distortion, and Saturator which all can add different characters but I’d bet you blew a ton of bones on Black Friday for some sauce you haven’t poured on yet. Duplicate distortions for interesting effects and manage the volume with multiband dynamics or a compressor.
- Don’t get lazy and slap through presets, actually synthesize and play with your sound sources!
- Articulated white noise sounds extremely dope, you can modulate a cutoff with an LFO or other volume shaping to add rhythms in the white noise atop basses for sizzle and shimmer.
MIDI tips
- Draw 16 bars in arrangement view, select the clip, then inside the midi clip you drag the loop marker backwards to make it a 4 bar loop
- When inserting notes in MIDI, learn and apply the keyboard shortcuts for the midi editor if you aren’t using the following shortcuts, you are wasting time:
- Use shift and left/right arrow key to make notes longer / shorter
- Use the control + left/right arrow keys to select different notes
- Use control+d to duplicate notes
- Pitch up and down in case there’s a sweet spot – the Pitch Midi device makes these kinds of decisions really quick and reverse-able and you can hold shift and press up and down in the midi grid.
- Try arpeggiation and play with the gate and rate parameters, sometimes you’ll find that perfect syncopation that will make the groove swing.
Automation tips
- You can duplicate automation by pressing Control+D
- You can resize automation by hovering your mouse over a shape then dragging the box
- You can drag automation sections up and down by holding down shift
- Alt curve automation lines while dragging them by holding alt