

I hope you’re having fun now because after completing parts 1 and 2, you now have the essentials down! At this point you should understand the following:
- Switching between Session and Arrangement Modes
- Setting BPM / Key for tracks
- Adding MIDI tracks and Audio tracks to projects
- Using the drum rack for MIDI drum kits
- Using the midi note editor and playing instruments and writing basslines
- Basic audio workflow with Warping
- Using the simpler for creating instruments from sounds
- Using the tuner and EQ3 for inspecting and spacing sounds
With those tools alone you have a comprehensive pallet of what you can make in Ableton Live. In this lesson, we’ll be broadening your understanding of the available MIDI and Audio devices so that you can work more quickly and create better sections of music.
We’ll start with the MIDI devices:
- Arpeggiator, chord, scale, note length, and pitch
These devices make it easier to mix up and control the output from MIDI tracks. After we explore the MIDI devices, we’ll move on to some audio devices that are helpful in creating different sections of songs. The audio devices covered today will be:
- Auto-filter, beat repeat, and reverb
After you have a good understanding of these tools, you will be able to produce sections of music that give your songs structure. Songs with structure are much easier to dance to, evoke a stronger emotional response in the listener, and can be used to illustrate a journey in the listener’s mind.
Before we get into using the tools I’m covering today in Ableton Live, we’ll need to learn a little bit about the different sections of songs and create a shared vocabulary for what the sections are.
The finished / examples of the exercises we’re doing today are provided in Week3.zip – Download Week 3 Examples.
Breaking down tracks into their sections for analysis
A few years ago, I was staying with a producer friend and got to meet another producer who recently grinded hard for a year, producing a song every day. I asked him, “What was the biggest difference between where you were when you started and when you finished the year of daily songs?” He told me, “When I listen to music, I hear it differently now; I guess the number one thing I learned was what to listen for in songs and how to analyze them.”
In this section, I’m going to show you a critical analysis methodology that I’ve been taught by multiple teachers: ill.gates calls it “The arrangement exercise” and it’s a powerful way to look at music and break down the sections of the song. The approach applies not just to the overall structure of a song – it can also be used to take a closer look within the song in detail.
We’ll use my bootleg of, “Gold Dust” for an example.
I strongly encourage you to do this exercise very regularly with music you like. The first step you take is to open Ableton, set the BPM to match the track you’re analyzing, this track is 177, then put the track in an audio track:

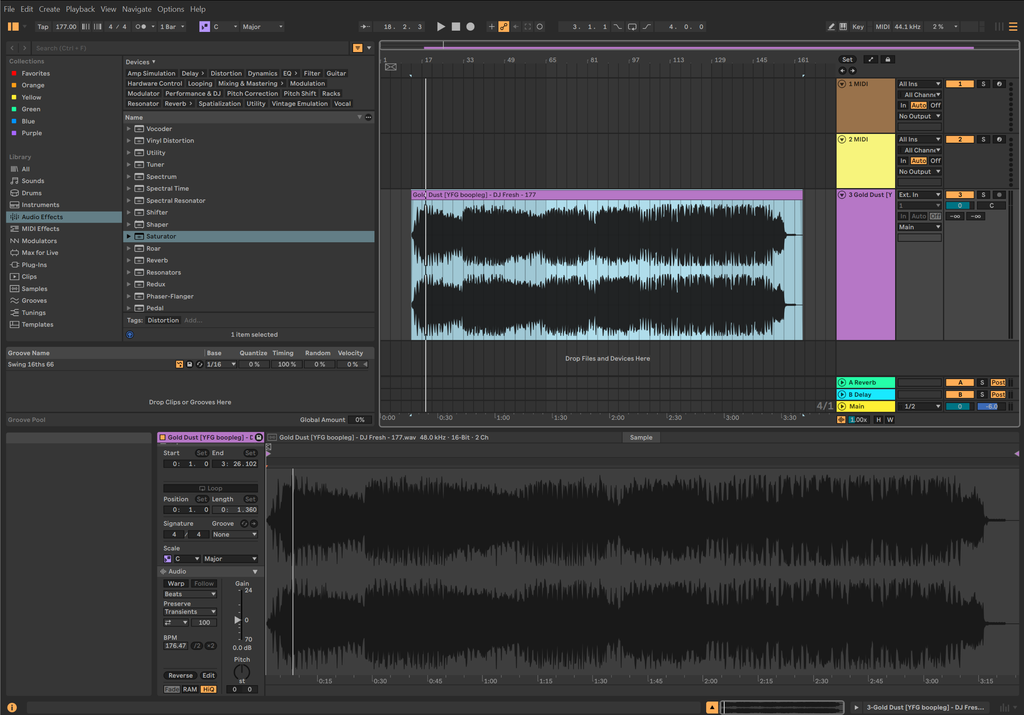
You may have noticed that I didn’t put the track directly to the beginning of the track lane, this was because in this particular case, the track doesn’t start proper until about two bars into the song. In songs that have really good structure, you should be able to visually see where the sections change, this is a great example. At the end of bar 16 (17 on the top) is exactly where the intro stops and the song phrase begins – I know that that phrase ends around bar 33 because the song visually changes in the spectrograph at that moment:

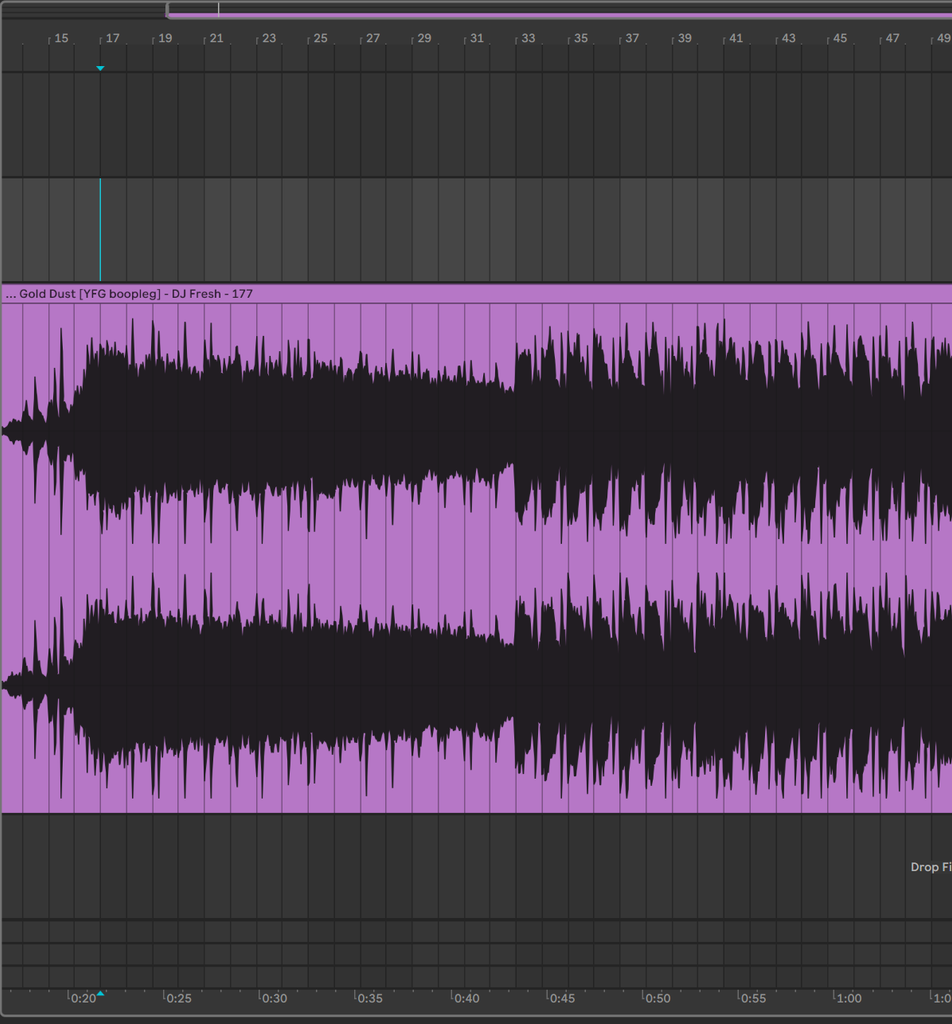
You don’t have to do this, but I find it helpful when analyzing songs to align section transitions on the grid where the colors change when possible.
After you have the song in the correct BPM and have it laid out on the Ableton grid, add section markers for each of the different sections. The section marker button is in the top right of the Live program, just above where the tracks show up, it’s in Orange in the following image:

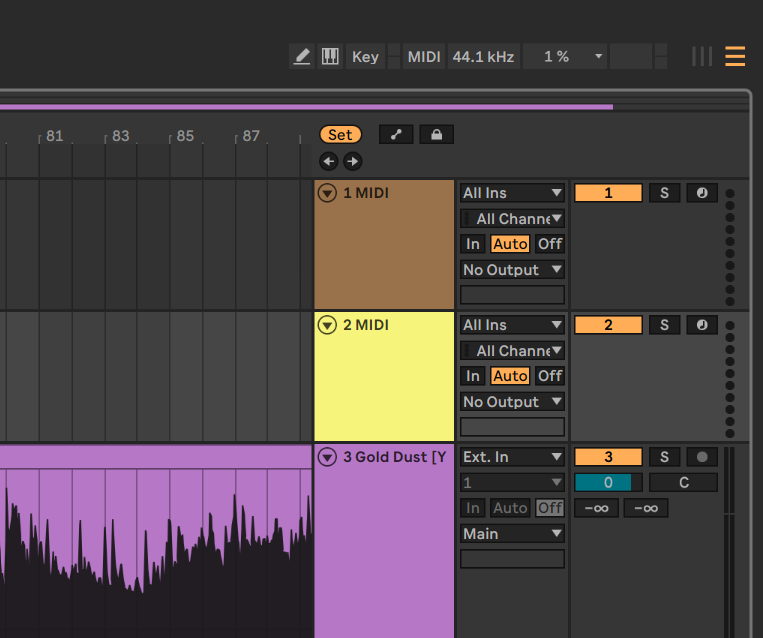
When you set a location marker, a little flag will appear in the top navigation for your track:

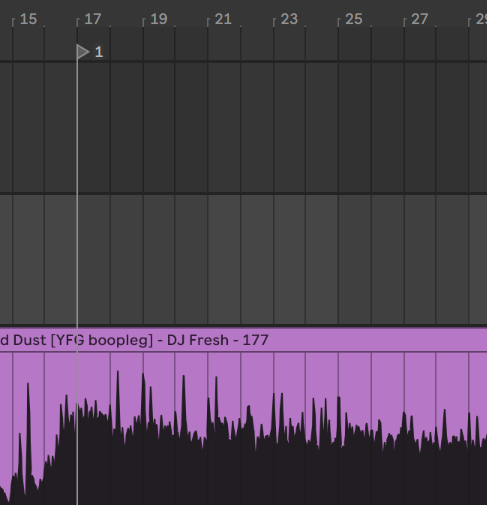
Drag this flag so it lines up with the parts of the song where you notice a section change and then press Control+R to rename the marker, I’ll call this Intro:

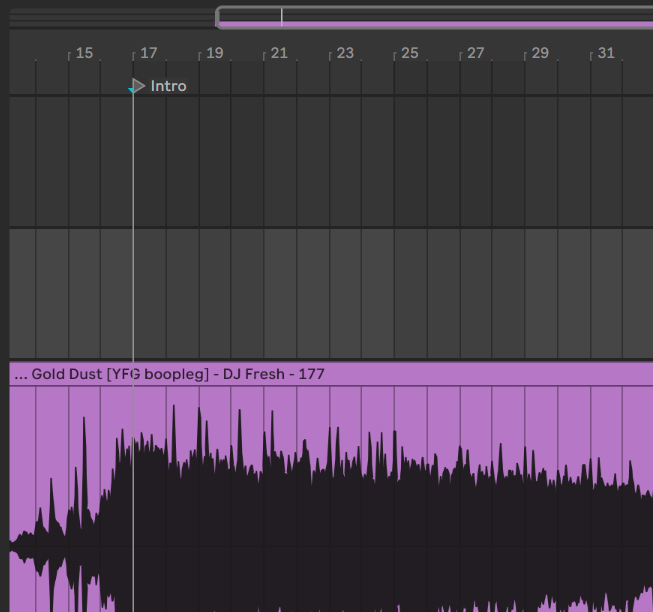
After you have set markers in the track marking parts where you notice song changes, you will have something like this:

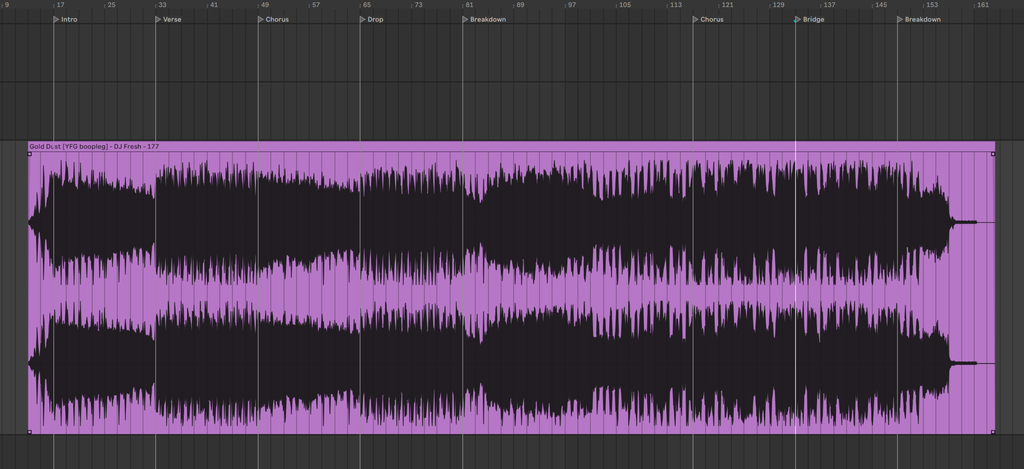
I use a few different naming systems for song parts and the actual names of the parts is less important than their role in establishing that a change happens there – changes over a song are what gives a song structure. I like to break the song into these sections at this level of detail:
- Intro – Parts of the song that reveal what is going to come but holding back
- Verse – The core part of the song
- Chorus – The repeating part of the song
- Drop – High energy section
- Breakdown – A section with restrained energy to make room to bring the energy back up
- Bridge – A section that breaks song structure to bring parts together
- Outro – the ending part of the song that leaves and easy transition for DJing
These are the moments of change in a song and the places where those changes happen are the most challenging parts of a song to write. Now that we have the markers in the song, it’s time to do the next piece of analysis: adding blocks for similar sections in MIDI for further analysis.
In a MIDI track, highlight a section and press Control+shift+m to insert a MIDI clip to mark the part:

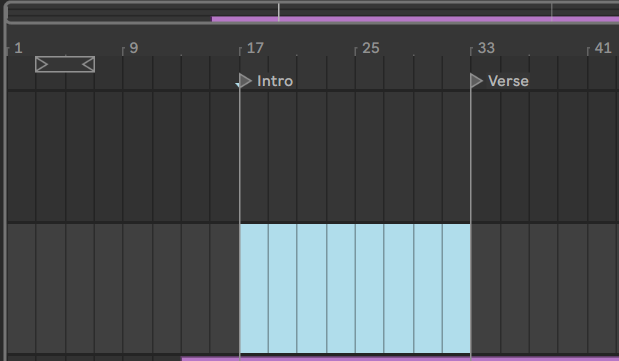

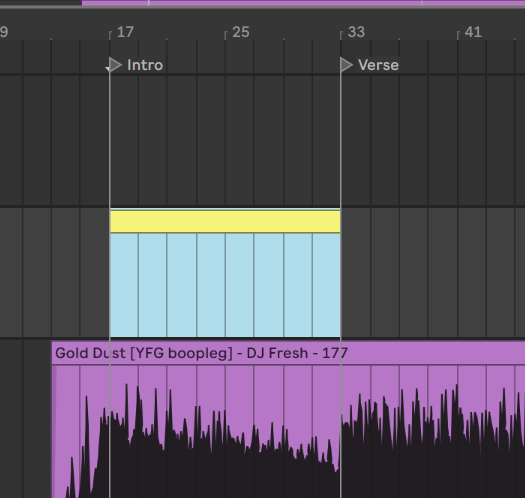
After you do this for more sections, color in the sections to make it easy to see in the song where similar sections sit. With MIDI clips that are color-coded for similar sections, your arrangement analysis may look something like what I have:

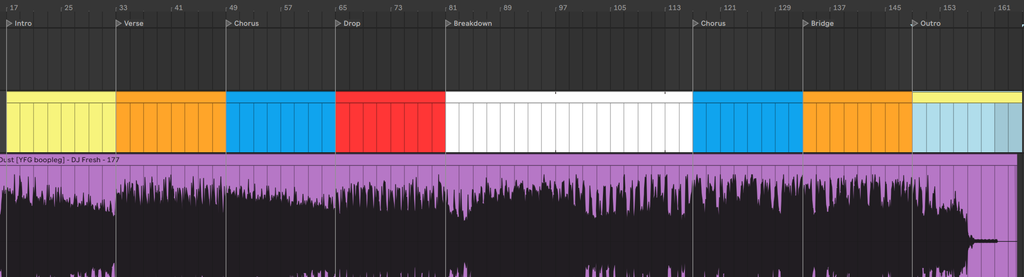
When you do this, you might notice problems or bad patterns in the song structure. In this song, you’ll note that I added a phrase in the breakdown that is 36 bars mismatching the rest of the song which comes in 16-bar phrases:

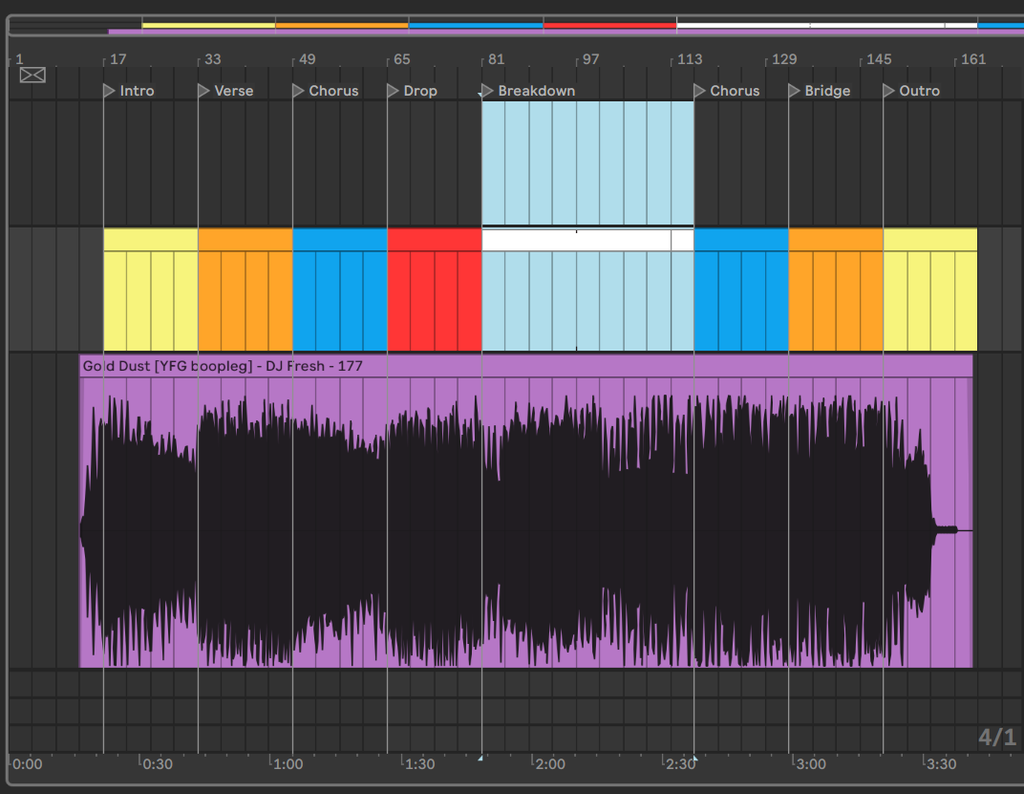
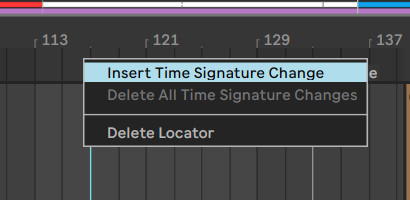
You typically want to avoid doing this because it can make DJing more challenging – I may even have been messed up in sets because of this particular bad phrase. Anyways, if you want to make the phrasing match up again, you can right click on the timeline and Insert a Time Signature Change to make the grid realign:

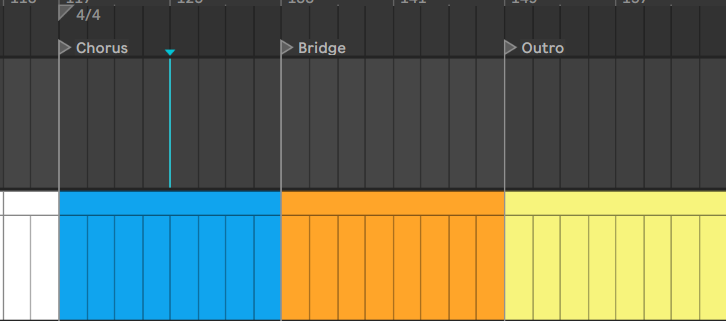
This will reset the checkerboard in the grid:

If you do this exercise with your own songs, it can sometimes highlight areas that should be revised (present party included haha). Anyways, with our sections in place as MIDI, which we did just to get a bigger picture of the song, we can now go to the next phase of analysis: paying attention to the transitions between the sections.
There are infinite possibilities for ways to make sections transition, a few examples with names I’m making up as we go:
- Build up – Drums that come faster and faster, this is typically done with fills or editing midi notes in your drums.
- Negative space – Taking away all of the sounds before a section change – sometimes having a nice little FX sound that is left alone creating a dramatic moment.
- Filter or amplitude shift – Taking parts of the sound away to signal a change. This can be done with filters.
- Pitch – Transforming sounds to have higher or lower frequency to signal the change. This can be done with risers, uplifters, and downlifter sounds.
- FX transitions – This can be things like a tape stop, delay, or other device. You can also use sounds from an FX library or a reversed percussion sound like a reversed crash to signal a change.
- Melodic transition – This can be done by making a section of sound that signals the change, like taking a scaled progression and just making it the same note repeating.
The next part of this exercise is to look at the transitions and think about how they’re used in the song you’re analyzing. Let’s look at the first transition here:
In my track analysis, I’ll add another midi lane and make a note that there’s a riser here:

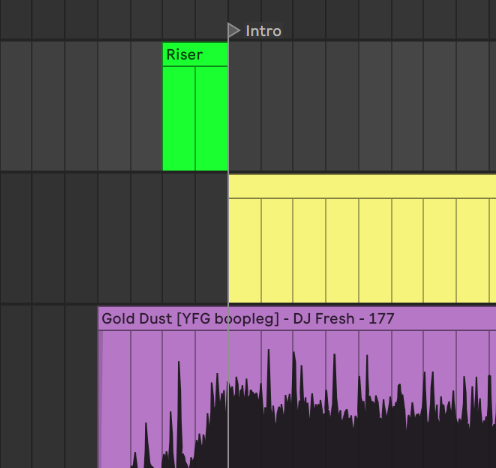
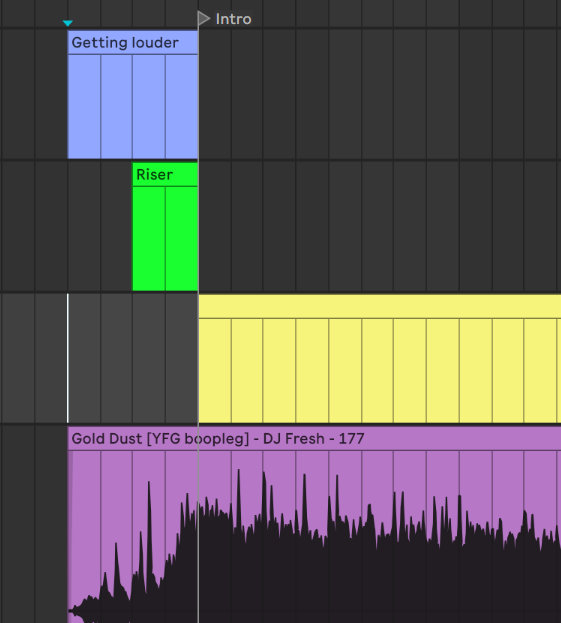
You could also get more detailed in your analysis and note also the transition brings up the track loudness:

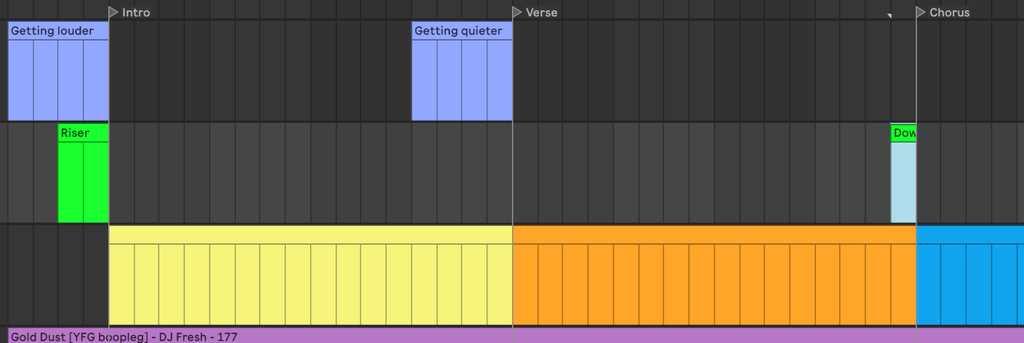
I’ll continue listening to the track and marking sections with different transition notes, the track gets quieter before the verse and later it has a down-pitching sound before the chorus comes in:

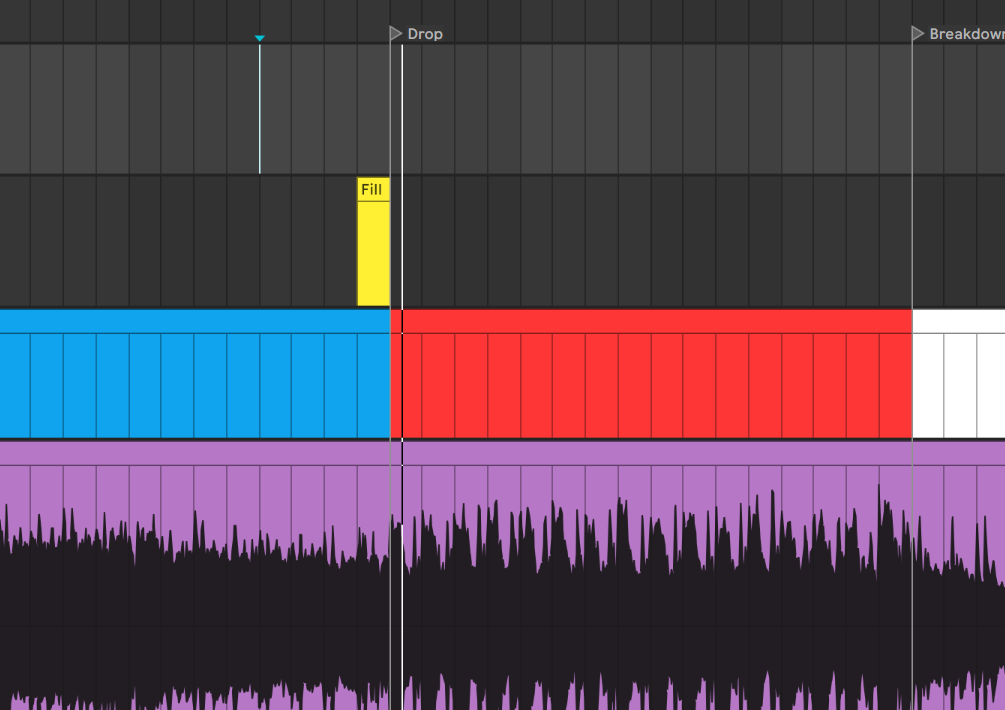
Around bar 65, I noticed a fill:
I added notes there too:

I’ll keep going through the song, taking notes on transitions and transition sounds in a way that is meaningful to me. Listening to bars 79-85:
Here’s another example where the transition happens into the new section in addition to at the end of the previous section:

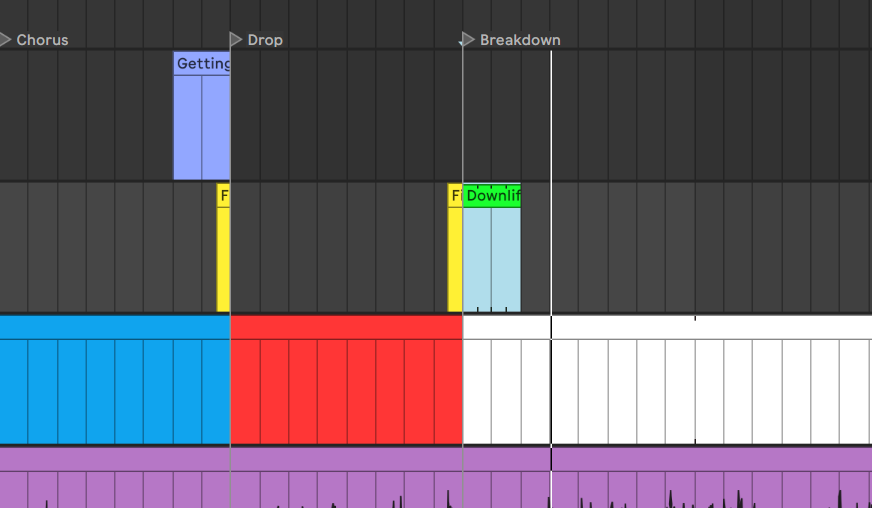
The drop section ends with a fill and then there’s a big downlifter in the breakdown section around bar 81.
Now that I think more on it, this downlifter transition is probably the right place for the phrasing in the track to reset so I’m going to delete the time signature change later and place it here because that’s where the phrasing resets:

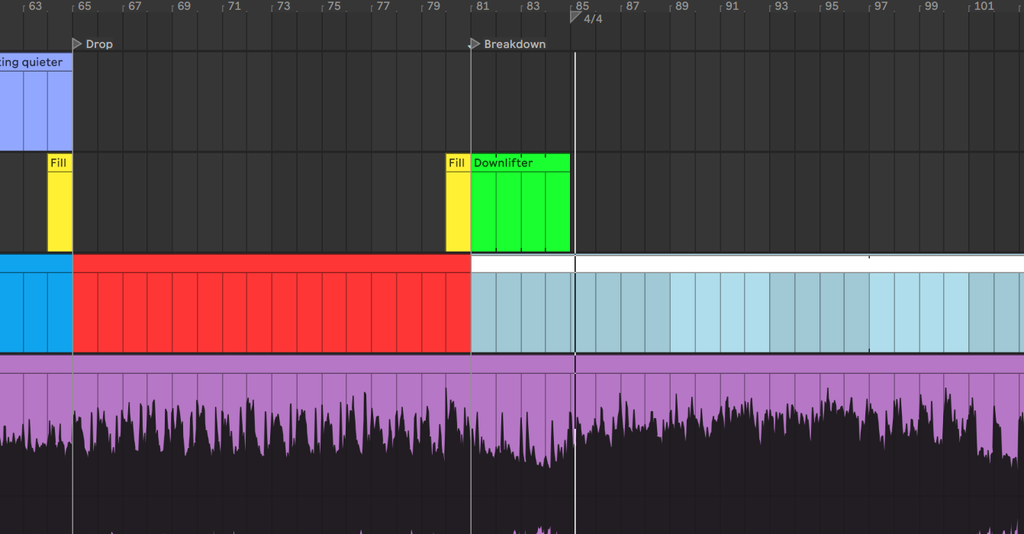
I continued to look through the song until the end and added some little notes for how the transitions were done and ended up with a high-level picture of the transitions in the song, where they are located, and how they bridge the sections together, paying attention to volume change and the types of transition being applied to smoothly change the music:

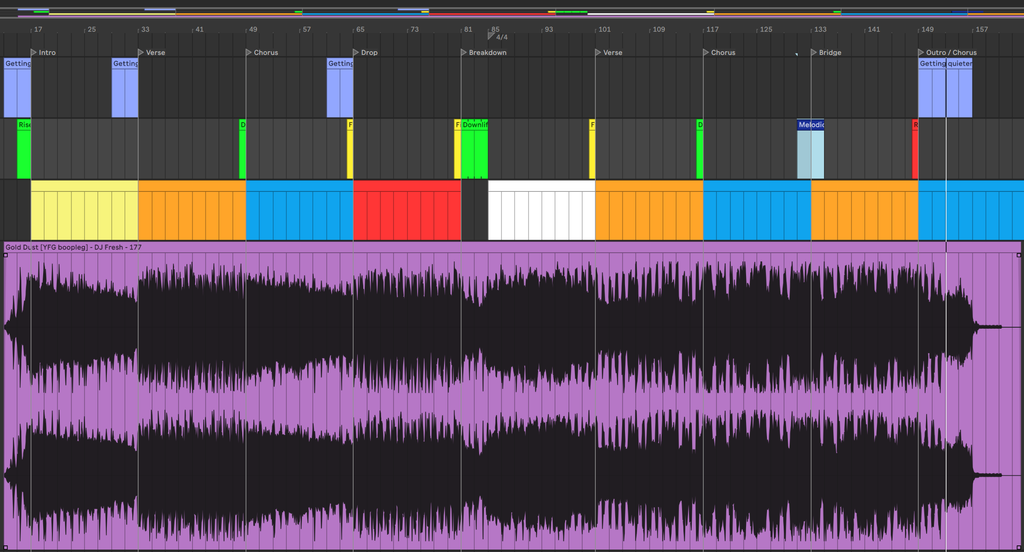
I’ve provided the project with my analysis as week3-pt1-177bpm. You can take a look at the transitions and notes as an example for how you can do this. As you improve as a producer, you will find these types of breakdowns, focused on what you are learning or working on, to be immensely helpful in sparking creativity in your own music.
Before continuing I want to impart on you a few key things to know:
- My naming is not necessarily “right” – you can disagree with the labels I use. These are just what is meaningful to me and we can hear different things and pay attention to different things in songs, there’s no right or wrong.
- This is only one way of breaking down songs for analysis – you can do the exact same exercise focused on drop phrasing – listening for parts in a drop, drum phrasing – listening for different drum patterns, melodic phrasing – paying attention to melodies and how they change, loudness phrasing – paying attention to which parts become quiet and which parts become loud, and so on. The key exercise here is to closely observe parts of a song that you like to understand better why you like it and how it inspires your music.
- Analysis of songs is probably the most impactful thing you can do while learning – and we never stop learning in this game. Make a habit of doing this occasionally to keep learning new things and looking for new patterns.
- If you ever get stuck and don’t feel motivated to make music, doing this exercise is a powerful way to get unstuck or at a minimum make use of the time that you set aside for practicing.
A final comment on analysis is that you can use this method to creatively remake tracks. All of your favorite producers remake tracks all the time and sometimes through the process of remaking a track, you get inspired to turn it into your own track. It’s perfectly OK to borrow the structure of a track; however, if you take an entire track and copy its melody, drop structure, drums, and arrangement, people don’t like that. I’ll note that this song itself is a full remake of Gold Dust that only borrows the vocals but I would never release this track as my own music because it borrows too much from the original material.
Now that you have an understanding of how to listen to a song for transitions, let’s look at the Ableton Live devices that are there to help you build these.
Ableton Intro MIDI Devices
We’ll start with the Ableton Intro MIDI devices to get some sounds in our project that we’ll work with later on. The structure that we’ll be trying to produce will borrowed from my example earlier, which borrowed its own structure from the classic track, Gold Dust: Intro > Verse/Drop > Chorus > Drop. I’m not sure exactly what we’ll be starting from as I’m writing this so the way that we’ll get from one section to the next will be improvised as we go along.
Some drums
I like to start beats with some drums, so we’ll pick an arbitrary BPM, 155, and a key for our song, D major, and we’ll put some drums in. Let’s grab the free Ableton Live pack, Singularities, to get some drums and instruments that we’ll use in the track today.
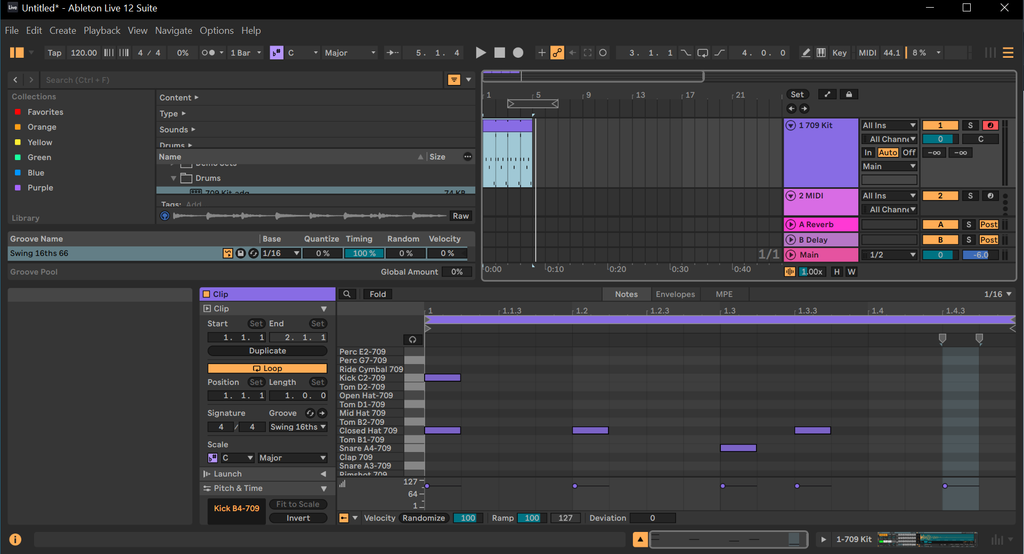
Set the Tempo to 155 and key to D Major as we have done in previous lessons, and create a MIDI drum loop that is 4 bars long putting the Neon Midnight Kit on the first MIDI track. As we did before, I used the loop selector to loop the 4-bar track to just one bar and then created a basic drum loop:

(Zoomed)

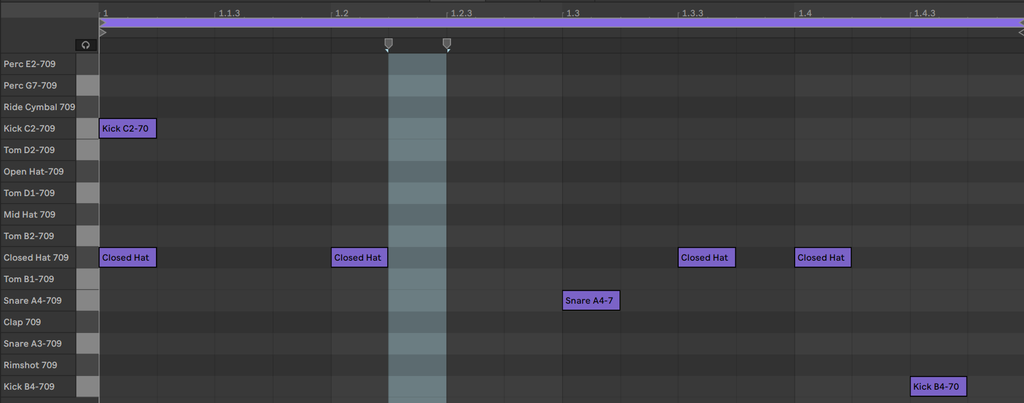
With the loop just to 1 bar, I set the kick on the first beat, added a snare on the third beat, then put a closed hat on the first, second, double-time in the middle of the third beat, and on the fourth beat, and finished the beat with a late kick right before the end of the bar.

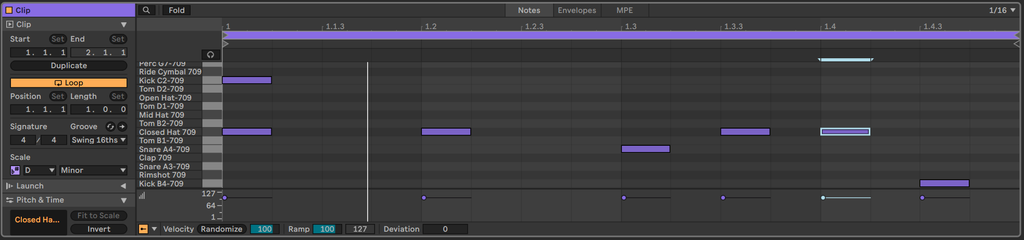
(Zoomed)
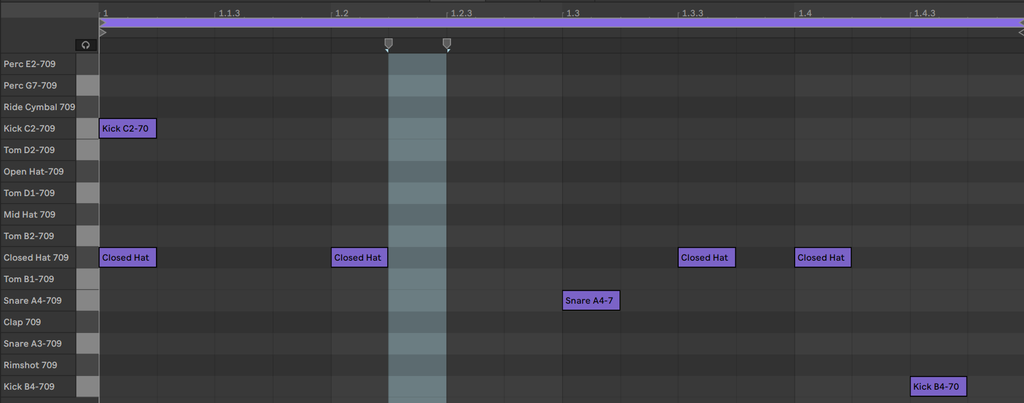
We’ll add one more alteration on the 4-bar phrase by editing the fourth bar in the song, changing its color, and then adding some extra hats in the beat and adding an open hat where the phrase ends:

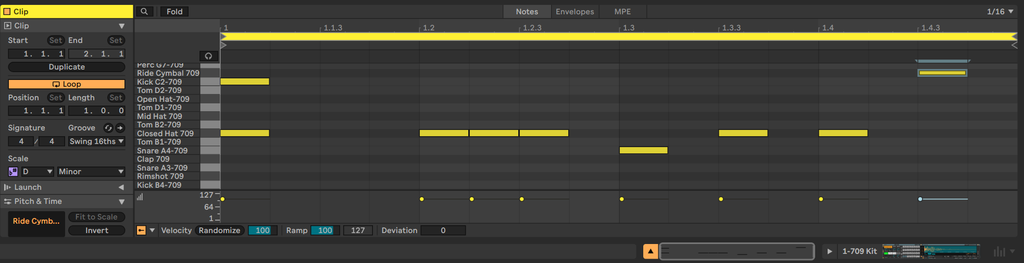
(Zoomed)

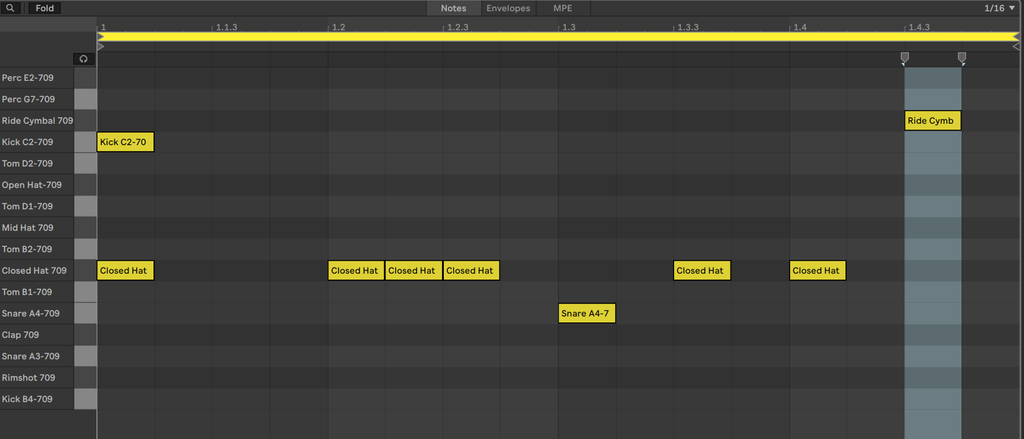
This is enough to start from and we’ll start building some melodic phrases on top of this next using the MIDI devices.
Chord MIDI Effect
We’re going to start with a sound that we’ll be giving to the Chord MIDI plugin. Select an instrument from the sound pack we just downloaded and add it to the second channel, I chose the “Kershaw SynBrass” instrument. Add another MIDI clip after adding the instrument device and open the MIDI clip to add some notes.
We’ve already selected the key of D, so the note that are in key are highlighted in the note editor. I’ve picked a few in-key notes with a little melody that I like C-A-D-G:

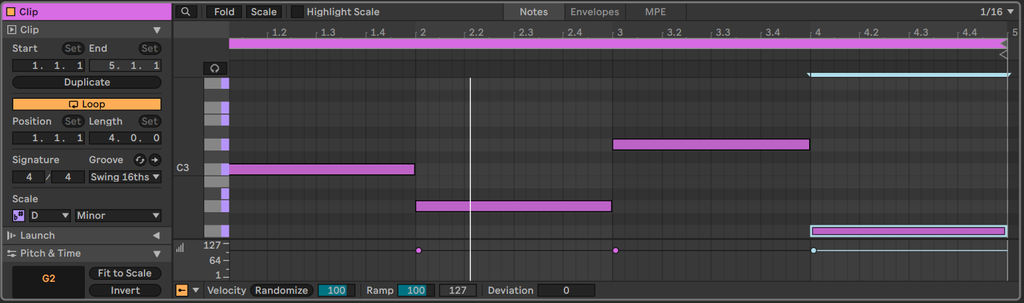
It sounds like this:
Notes are chill but it would be cooler if we had some chords, so instead of adding all the notes of our chords by hand, we’ll use the Chord MIDI Effect:

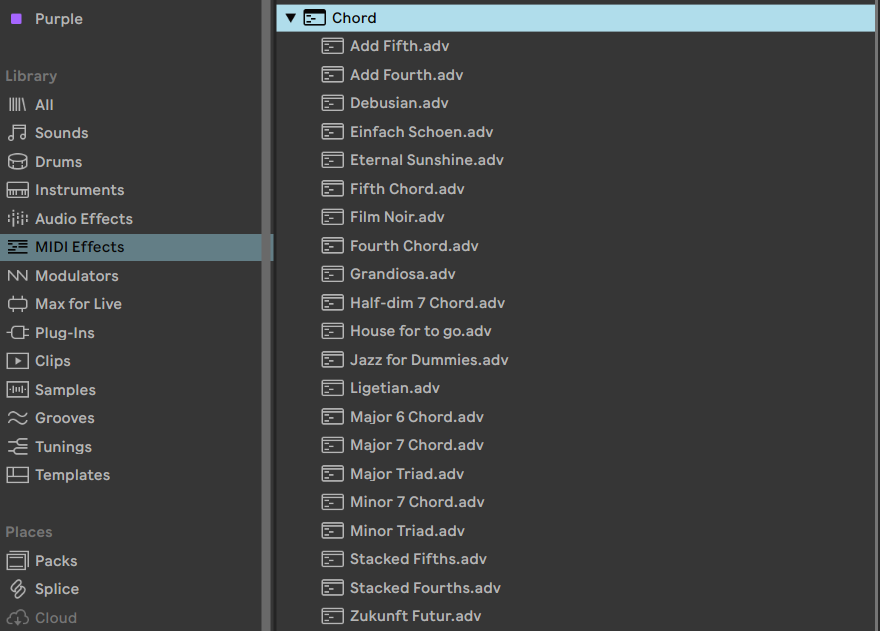

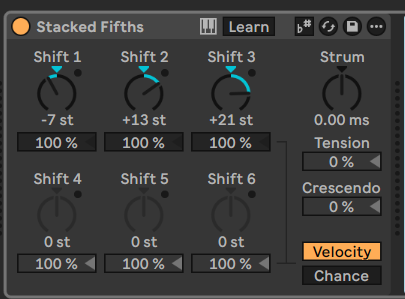
We’ll select a chord from the presets, I chose Stacked Fifths. Now when you play a note, instead of getting just the note, you get a chord:
It’s sounding a little more interesting! Let’s duplicate the sections we have made in the arrangement timeline and change just the second part of the melody to add to the first melody:

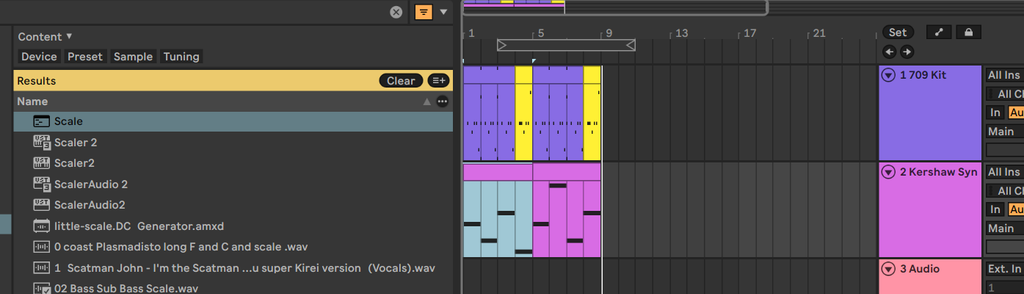
(Zoomed)

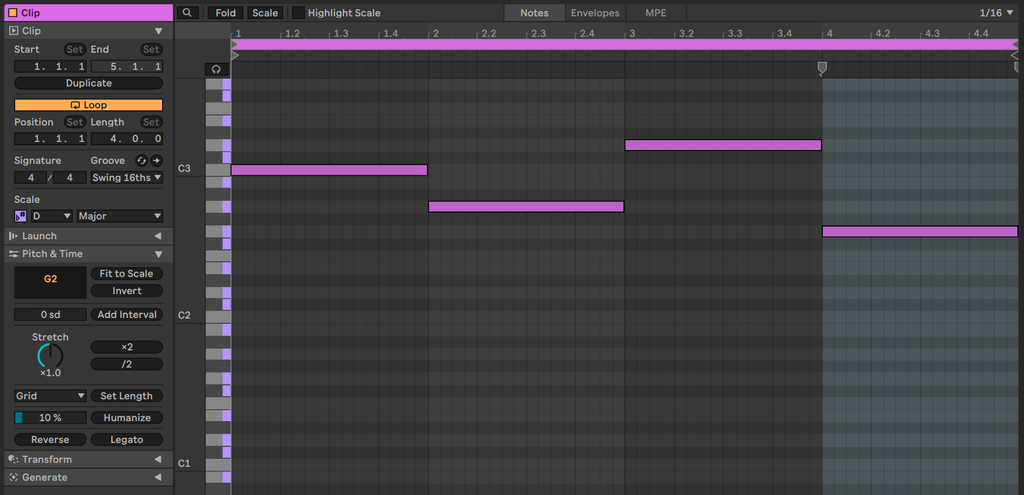
The notes for the second 4 bars are C-G-A-D. You may have noticed that these are the same notes from the first four bars in a different order, I find this to work well for finding melodic variations that feel cohesive: using variations of the same notes.
Let’s inspect what the chord device is doing, if you press shift+tab, Live will switch between the note editor and the device view. When the device view is open, it will look like the following image:

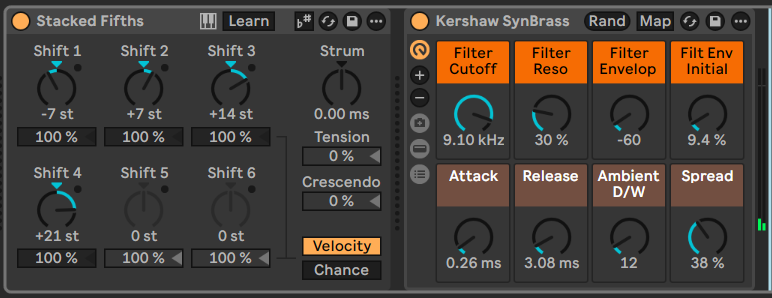
What the Chord device is doing is adding a midi note at each of the shift positions that are set up in the device before sending the MIDI (note messages) to the Kershaw SynBrass device. You can adjust the notes that it’s sending or double click them to set the note being sent to 0, which disables the note.
Try experimenting with adjusting the values of the shifts to see if you like a different chord more. You might notice that some values don’t sound right to your ear. This is because right now, if the note lands in a spot that is out of key for the scale that we’re in, it will play the out-of-key note. What if you wanted to control the midi so that the notes will always land on an option that is in key? This is what the Scale Effect is for.
From the MIDI Effects, open the Scale device and drag the Scale MIDI effect preset for Major scale to the devices view and set its key to D:

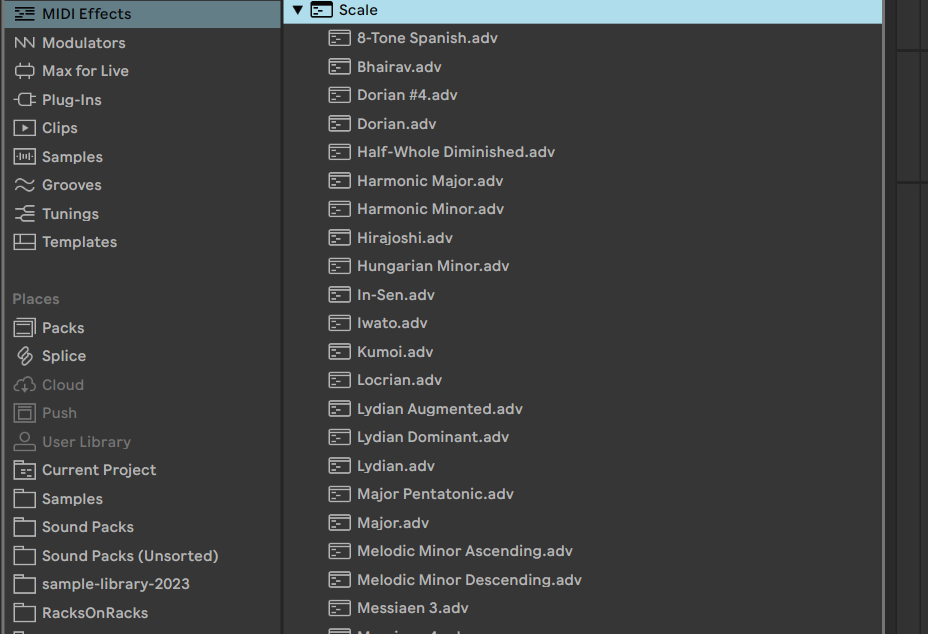
Now your devices view will look like this:

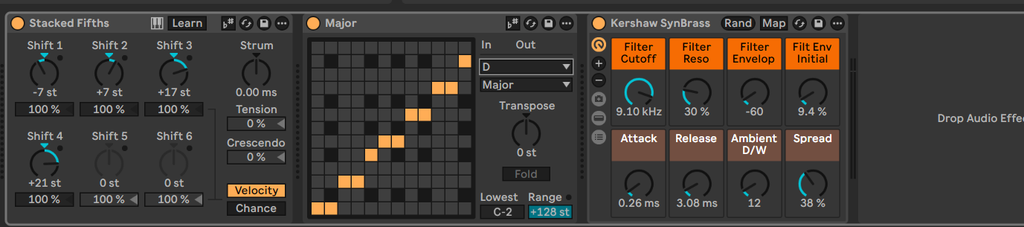
If you change the shift parameters in the Stacked Fifths preset of the Chord device, the notes will be adjusted to only be in scale for the D Major scale – which can be handy if you want the notes to stay in key. The device indicates this while playing and you’ll see notes that are filtered out in gray.

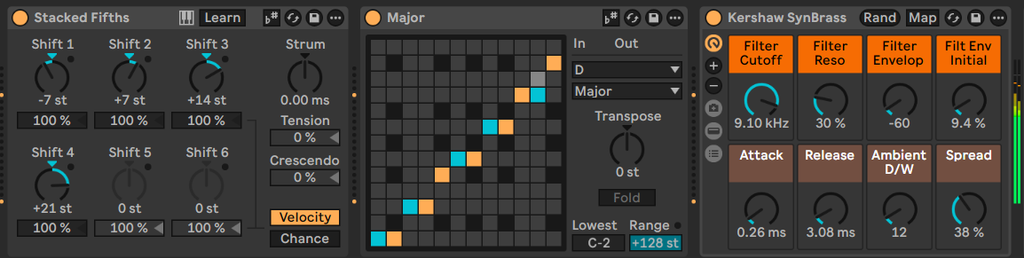
I’m really not feeling this synth, let’s change it up! New plan: you’ll be synthesizing your first instrument today!
Let’s replace the MIDI with this:

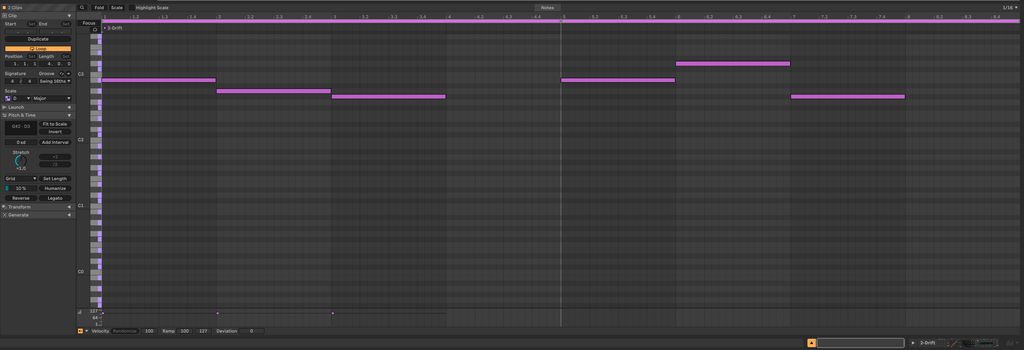
(Zoomed)

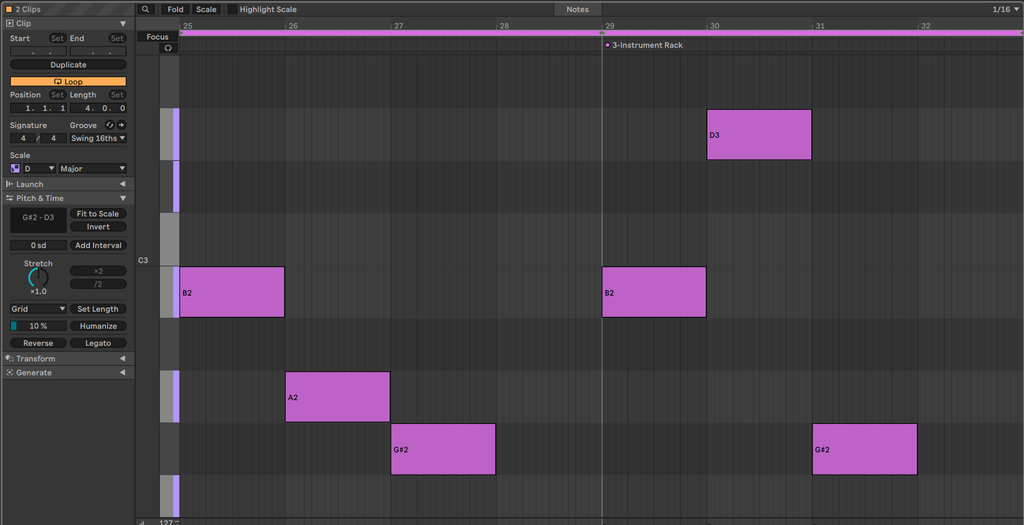
Replace the patch from the pack with drift’s init patch and change OSC 2 to saturated SAW:
Init Drift patch:

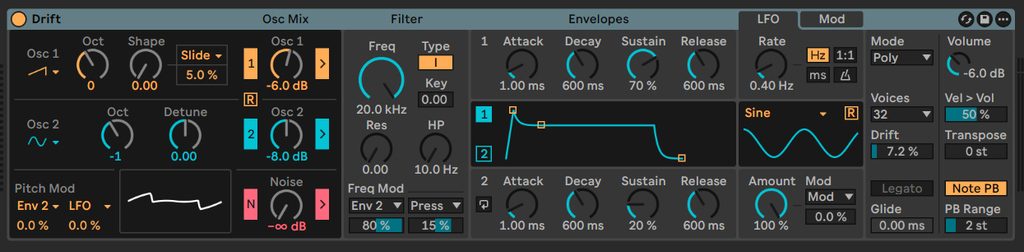
Osc 2 by default is a Sine wav, change it to the saturated saw:

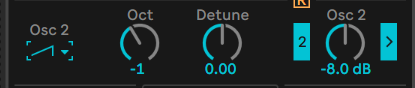
Now you’ll have a patch that sounds like this if you play with our drum pattern:
I’m not feeling the drum pattern that much either but we’ll get to that in a bit. The patch that you just made is a basic super-saw patch that was created by stacking two saw Oscillators. There are four types of oscillators included in the Drift synthesizer: sine, triangle, saw, and rectangle. The Saw sound is a classic building block for sounds in electronic synthesis and makes a bright, buzzy, and rich sound that really stands out when you make patches with it. This lesson is less focused on synthesis so we won’t dwell very much on designing this patch but will just leave it as-is with a basic supersaw.
However, we”ll do one more little synthesis trick to really lean into the sound and make this patch really shine: we’ll be stacking a second copy of the synthesizer on top of the first one. First, select the drift patch we just made in the devices view and press Control+G to put the patch in an “instrument group” and click the icon with the arrows on the bottom to show the list of instruments:

Next, click the instance of the drift instrument and press control+d to duplicate the drift instrument in the group:

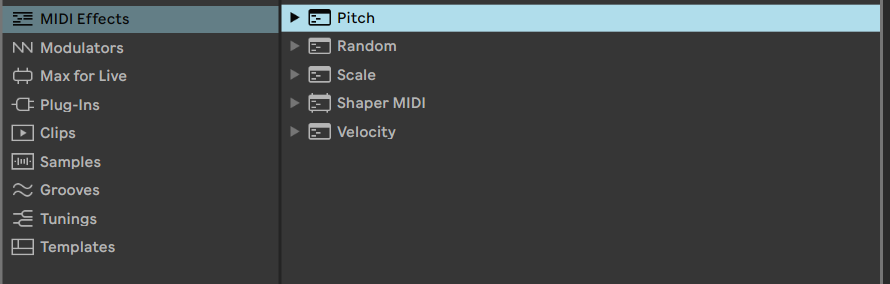
This just created two instruments that respond to the midi coming into them. Because the instruments are playing the same notes, it will just sound louder, which is nice, but we’re not done yet! We’ll add another device, Pitch, from the midi effects, to pitch up the second instance of drift to make it REALLY stack those saw sounds. Click the second instrument in the group and press Control+R to RENAME the second instrument, call it something like Drift Super:

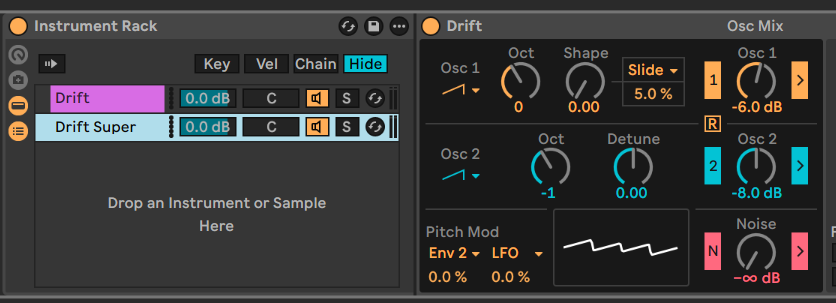
Then put a pitch MIDI device on the group and drag the pitch inside of the group to the “Drift Super” instrument in the group:


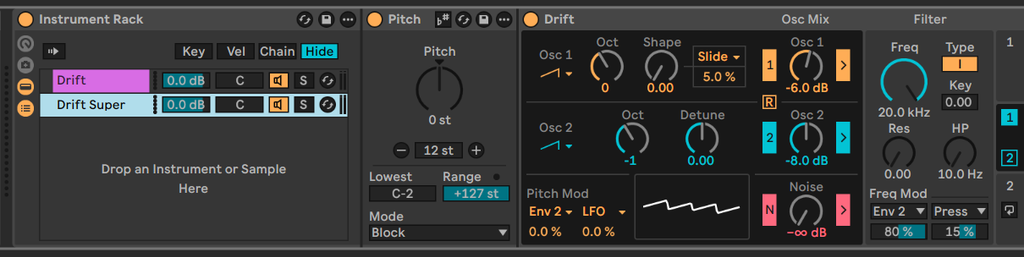
Pitch it up – hold down shift and press up on the pitch device to make it pitch up two octaves:


Now you will have two drift instruments sending a lot of voices, one that plays the lower octaves and another that plays the higher octaves, you should try soloing (press s) and giving your stack of saws a listen:
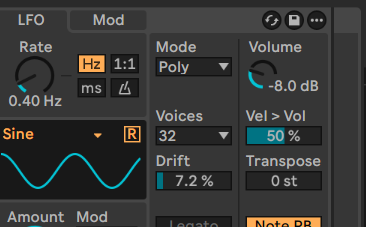
Now this is really dramatic and cool sounding, like Deadmau5 would do. However, because we’re playing two instruments at the same time, it’s a little loud for my taste, let’s turn down both of the drift instances so they’re not overpowering the drums. Use the volume control on the top right of the drift instance to lower the volume of the Drift instance to -8:



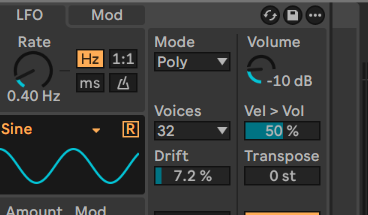
And we’ll lower the Drift Super instance to -10:



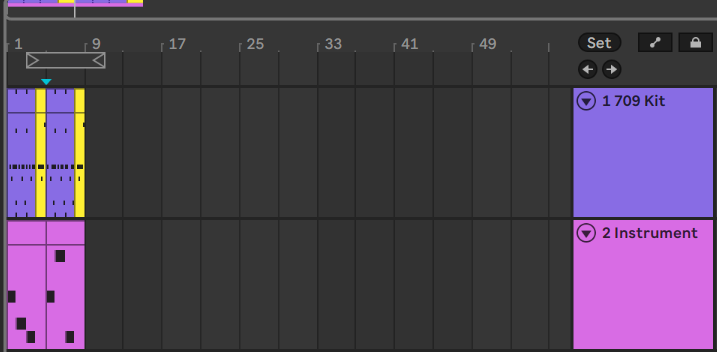
With our volume tamed a bit, take this whole section and duplicate it to end up with 16 bars. Highlight everything in the arrangement and duplicate it again (control+d):

…

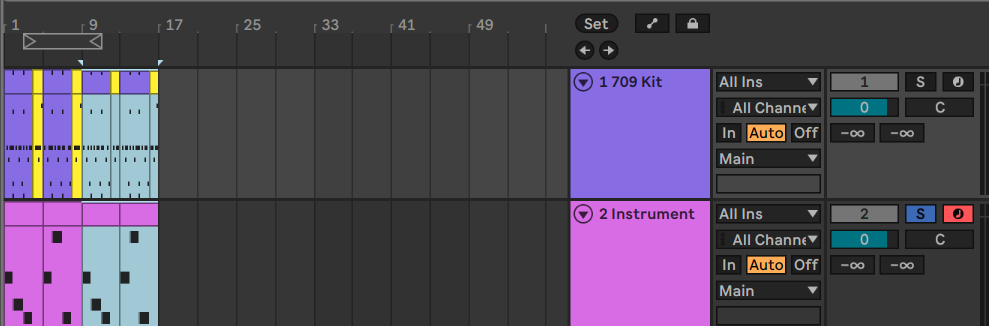
And finally, we’ll add our first automation that turns off the extra saw for the first 8 bars. Right click the Drift Super device in your instrument group and select show automation in new lane:

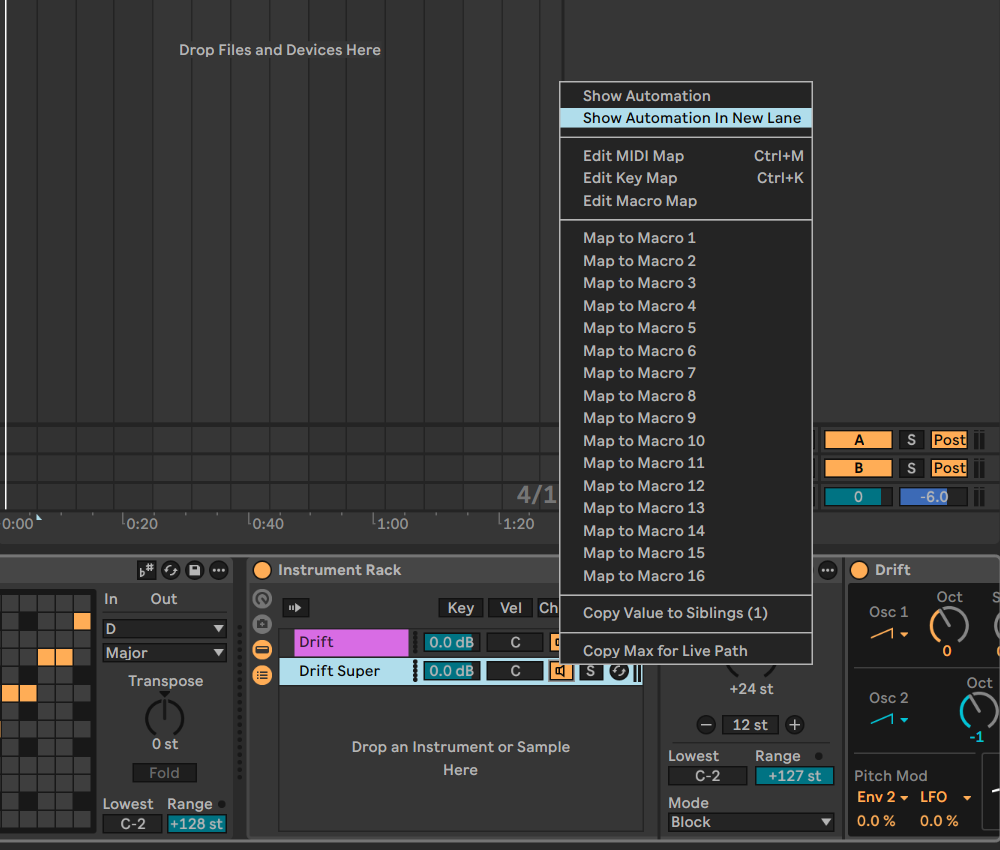
Automations allow you to draw lines that control parameters on devices, this will control whether the Drift Super instrument in the instrument group receives MIDI and outputs sound. We’ll click an automation on the second track at the 9 (8 bars in):

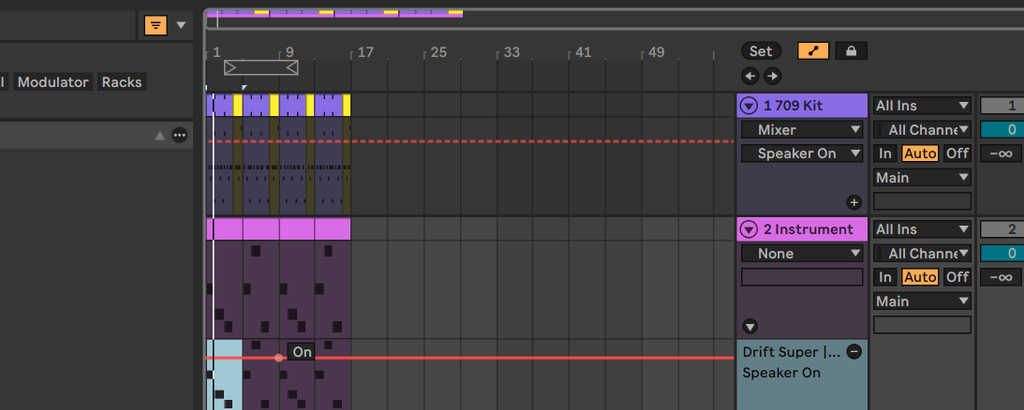
We’ll then draw automation to start with the “Drift Super” instrument off in the group at Bar 1:

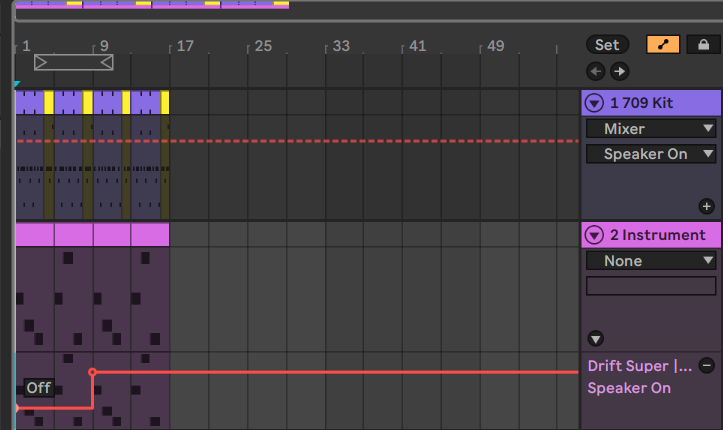
Listening back now, we’ll have a basic automation that holds back on the full supersaw sound until after 8 bars and then adds that dramatic stack later on:
Automations are a great way of bringing in and out parts of a track while reducing the amount of work it takes and can be thought of as having a little person holding and watching the knobs in a track. As you develop different sections of your music, this tool will come into play more and more.
Now I’m actually feeling this track, let’s keep developing it. The drums are not very emotive yet, so they’ll be a great starting point. Let’s duplicate the 4 bars between 13-17 change the drum beat to something a little more exciting, and add some track markers for our sections:
Duplicate, control+d:

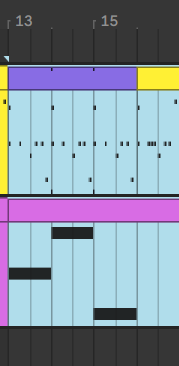
New drum pattern in track 1:

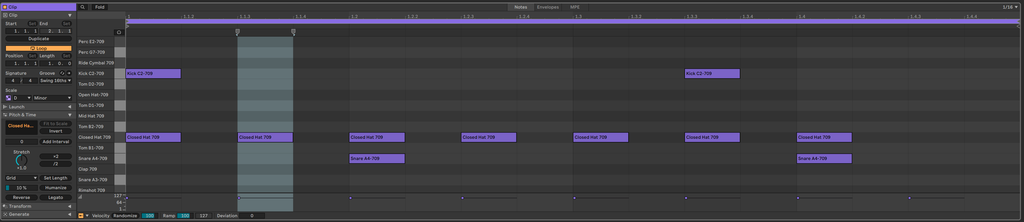
I decided to take the drums out entirely for bars 21-25 for a dramatic moment and put the newer faster drums back in at bar 25:


Now we have a moment at the “Verse” part of the track where it feels like something else should be coming in. Let’s listen back with the revisions to our track:
It’s just dying for a little bass and some riffs!
Add a new midi track by pressing control+shift+t. Add a bass sound from the singularity pack on the new MIDI track – I chose Sub Knock Bass. Now add a bassline for to the track in a lower octave than we are using for the saw sounds – I chose E1-G1-A1 and G1-B1-A1:

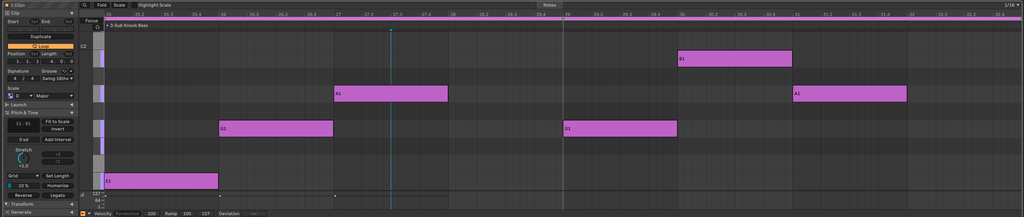
Now if you play back the track, this section will have some lower end filling out the song that we’re building:
Now what if we wanted to have the bassline have some rhythm to it? We could use our next MIDI Effect, the arpeggiator. From the MIDI effects, select the Arpeggiator and add it to the bassline:

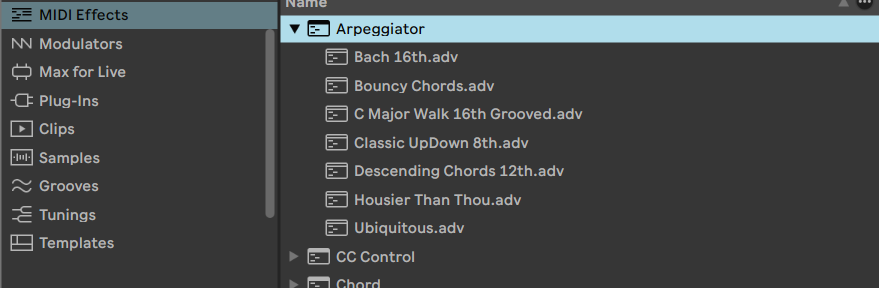

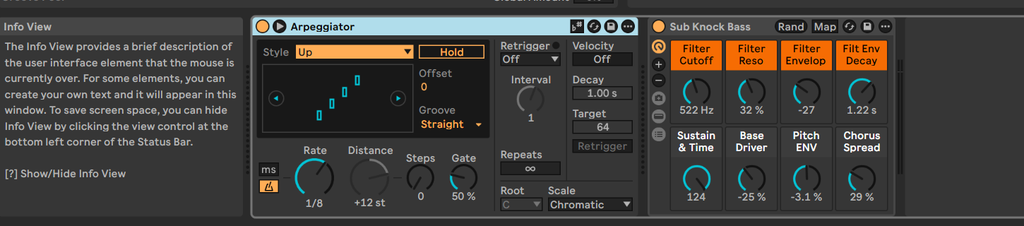
By default, the arpeggiator will keep rhythmically play notes at the rate that you set in it, currently set to 1/8 of a beat. Now if you listen to the track, the bassline notes will hit 8 times per bar, which syncopates nicely with the drumline.
Let’s duplicate those two sections again (control+d) to get a 16-bar phrase of the faster beat with bassline and saw sounds:

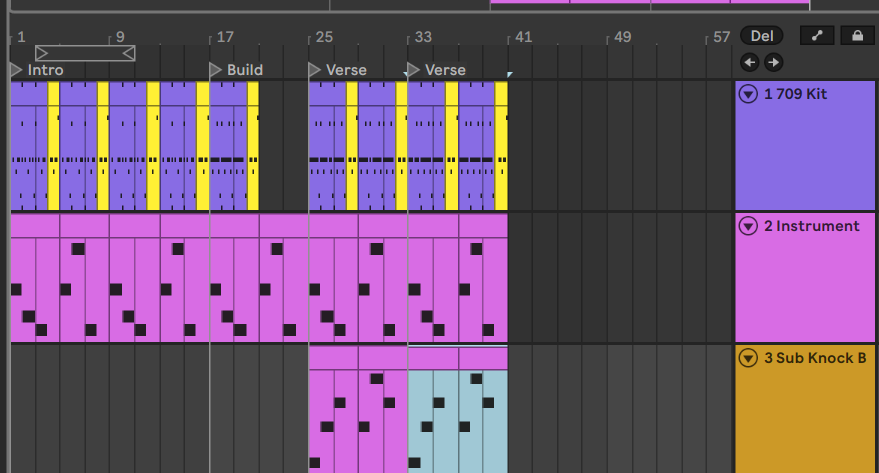
Now you have the bones of a track. Let’s add one final layer before moving on to the audio devices that we’ll be using to improve the transitions between the sections. We’ll start by duplicating the saw track by clicking the track on the right of the arrangement panel and pressing control+d for duplicate. This will copy the instruments, and all devices from then second track into a new track.

Select a new instrument, I chose Sludge Fuzz Pluck, and drag it onto the new track and delete the midi from the first half of the new track because this sound will come in at the same time as the bassline:

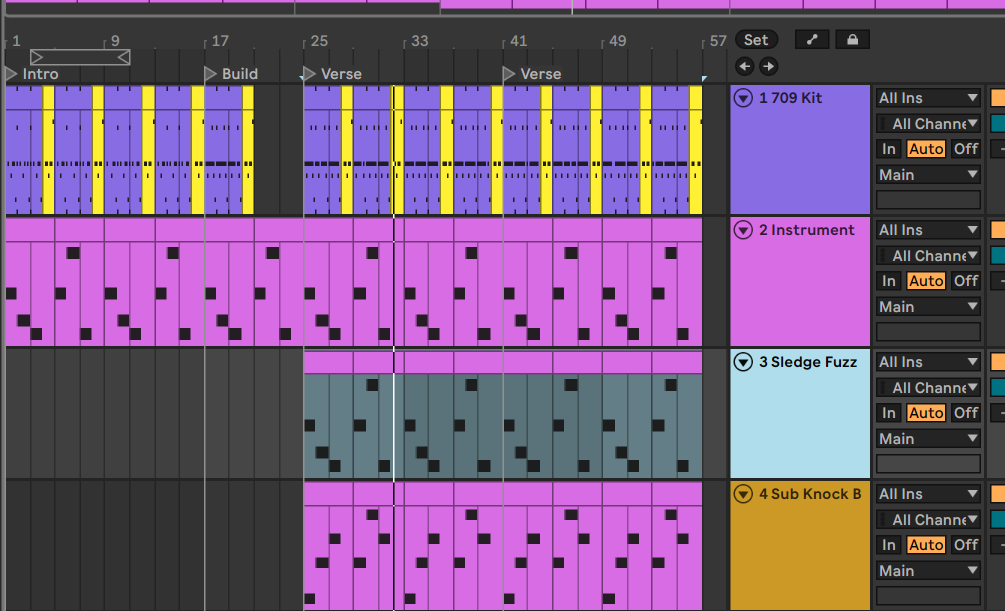
Note that if the track is playing notes out of key, you might have deleted the scale plugin, if you want to experiment with what happens when you don’t have the scale plugin, you can press the circle in the corner to disable to scale and listen for the “wrong” notes, they will be much more apparent than with the saws. Turn it back on or add the major D scale plugin back if this happened.
Open the new track and add an arpeggiator to like we did for the bassline after the scale plugin:


Now we’ll hear the chord getting “arpeggiated” through the new sound:
Let’s see what happens when we increase the steps on the arpeggiator to 2 instead of the initial setting:

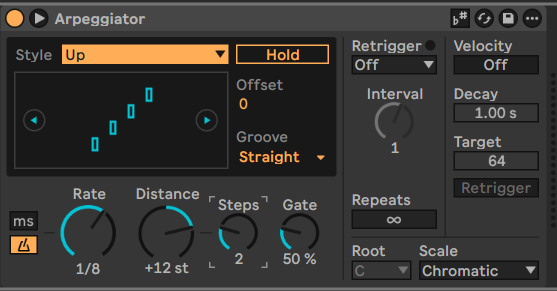
(In the full device stack)


Now we’ll have two steps of arpeggiation! The track will progress through the chord, then move up an octave and continue. This is an essential sound in techno music.
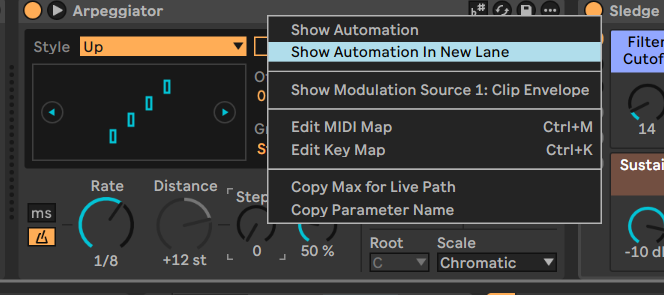
Let’s hold back the second step of the arpeggiator by using an automation again. Set steps to 0, right click the “Steps” in the arpeggiator, and click “show automation in new lane”.

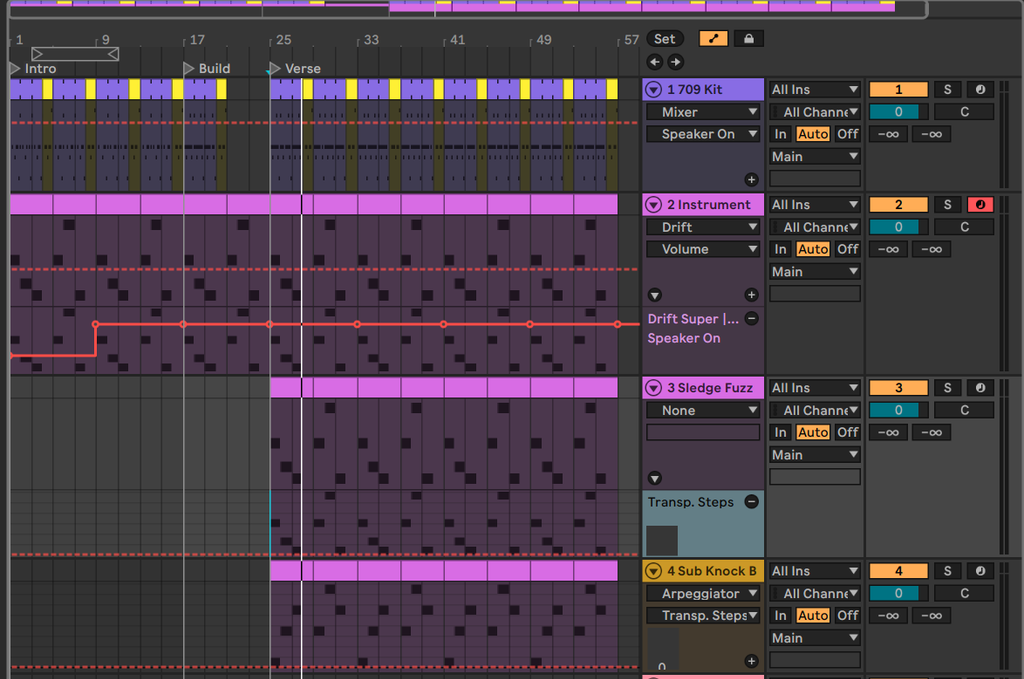
The arrangement grid will add a new indicator for Transp Steps below the MIDI track:

Now change the line so that it starts at 0 at bar 25, then steps up to 2 at bar 41:

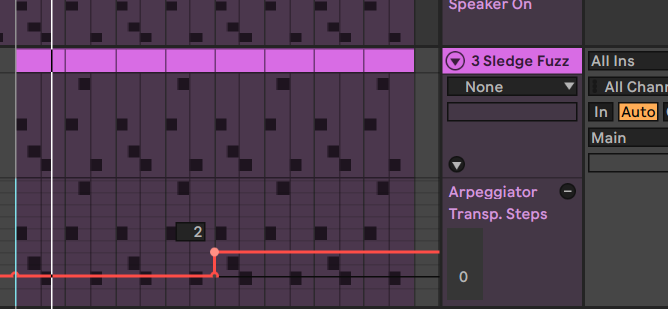
You can press a on the keyboard to turn off automation and if you listen, you’ll have the phrase with just 1 step of the arp, then two steps in the next phrase:
Let’s make one final touch on the plucks using the note length effect. We’ll use this effect to make the notes bleed into each other at the end of each bar. Find the Note Length MIDI effect:

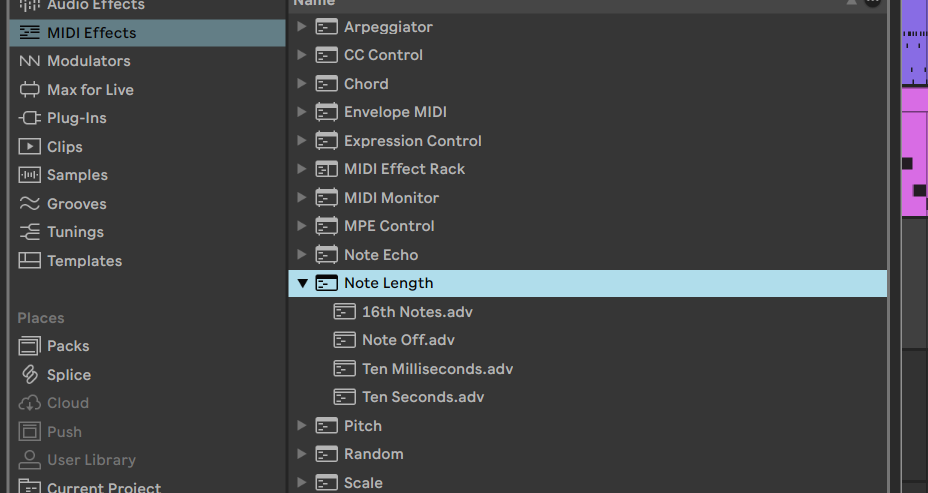
Add the note length MIDI effect after the arpeggiator on the Sledge Fuzz track:


The Note length effect changes the duration of the notes that come through in MIDI. By default, it will use Milliseconds, ms, change it to the metronome indicator which will use note steps and set it to 1/8 note, the same as the arpeggiator. The Gate dial on the effect will set the % of the note length to send, e.g. setting it to 200% doubles a note length. We’ll use the GATE to double the note length over the bar. Set the gate to 1%, right click the gate parameter, and then again create an automation by selecting show automation in new lane. This will show a line for the note length in arrangement view.
Draw a slope for the note length that goes from 1% to 200% to double the note length over the bar:
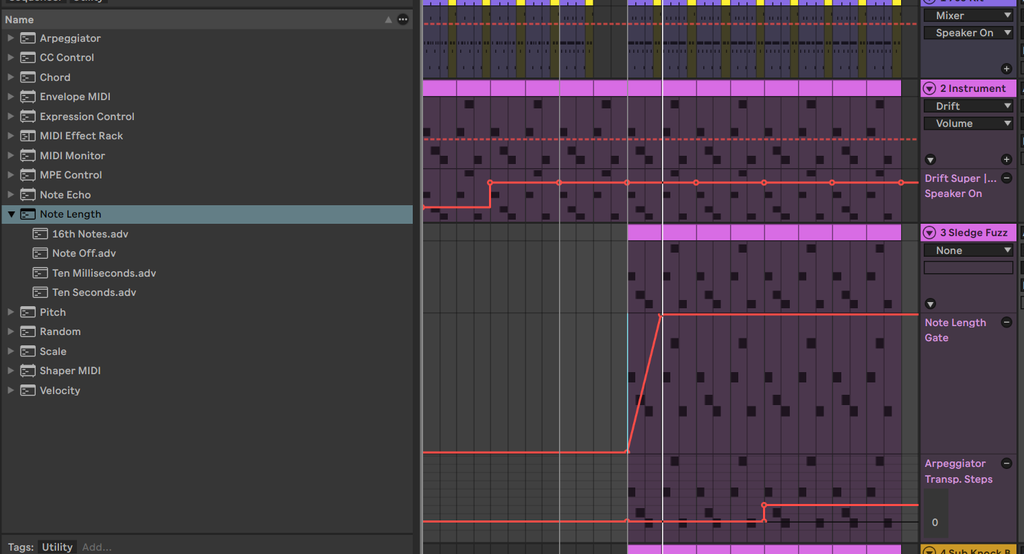
Finally, we’re gonna do one more little automation trick to duplicate that automation over every bar: highlight the automation, then press Control+d to duplicate the automation:

If you want to turn off the automation view, press a on the keyboard. Now when you play back the track, the ends of the bars will have these nice long notes that have a little up-pitch:
Now that you have produced a few different sections, let’s explore ways to make the sections transition into each other gradually using some audio devices.
Your bread and butter Audio effects: Auto-filter, beat repeat, and reverb
I got a little carried away in the other sections building a beat so we’ll go through the audio effects section a little more quickly. In this section we’ll be taking some inspiration from the analysis we started with for producing better transitions between sections of the song.
Audio effects in Ableton Live are devices that make it easy to create gradual changes in sections of music or remix sections of music. We’ll start with auto-filter, one of the most useful devices in Ableton.
Take the auto-filter and add it to your drums by dragging it from the audio effects to the drums track, which are in track 1 if you’re following along:

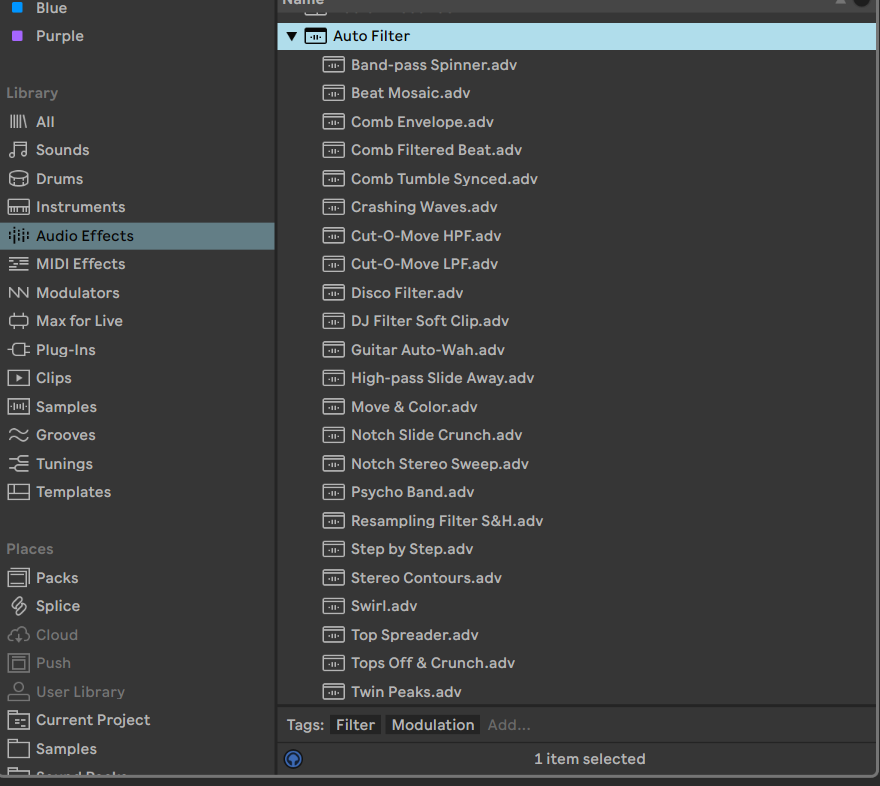


The auto filter shows the filter in the device shell and has a frequency knob for controlling the filter. To experiment with what the knob does, stop your track, play the track and adjust the knob while it plays:

The filter has different shapes that can be selected below the frequency knob:

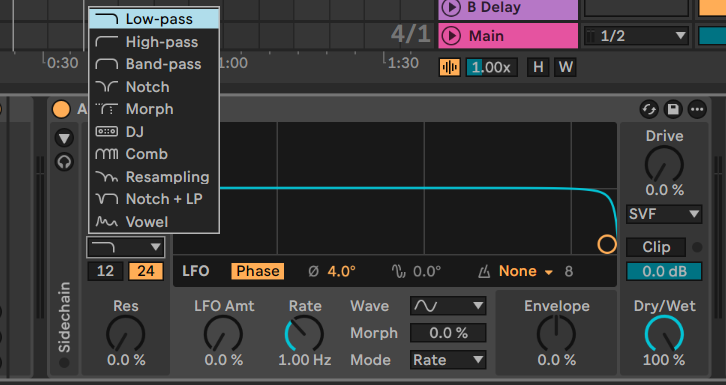
Filters work by FILTERING out sounds at a frequency, the available filters are:
- Low-pass – Lets the sounds below the frequency through
- High-pass – Lets the sounds above the frequency through
- Band-pass – Lets sounds around the frequency through
- Notch – Removes sounds around the frequency
- Morph – Mixes low, high, and band filters around the frequency
- DJ – Low-pass + High-pass filter combined
- Comb – Passes peaks (narrow bands) of frequencies through
- Resampling – Distorts sounds around the frequency
- Notch+LP – Combines low pass and notch to give a little bump around the frequency
- Vowel – Accents sounds like they’re passing through a mouth
Try listening to the different filter shapes on your drums while the track comes in for a moment – as you can guess this is a great trick for creating transitions in your tracks. Let’s set the filter to the high pass filter for the drums and draw an automation that sets the high pass to start at 20khz and move to 0hz after 8 bars. Note I’m adding an automation by right clicking the filter, then show automation in new lane, and then drawing the automation.

Now when you play back the track, the drums will slowly enter the scene.
Let’s do the same thing with a low-pass filter moving the opposite direction on the saw wave sound we made. Add an auto-filter to the second track, click show automation in new lane on the Frequency parameter in auto-filter, then FIRST adjust the sound until you barely hear the instrument, I think around 450hz is just about right. After setting the starting point, insert an automation that opens the filter from 455hz all the way up to 20khz by the 9th bar:

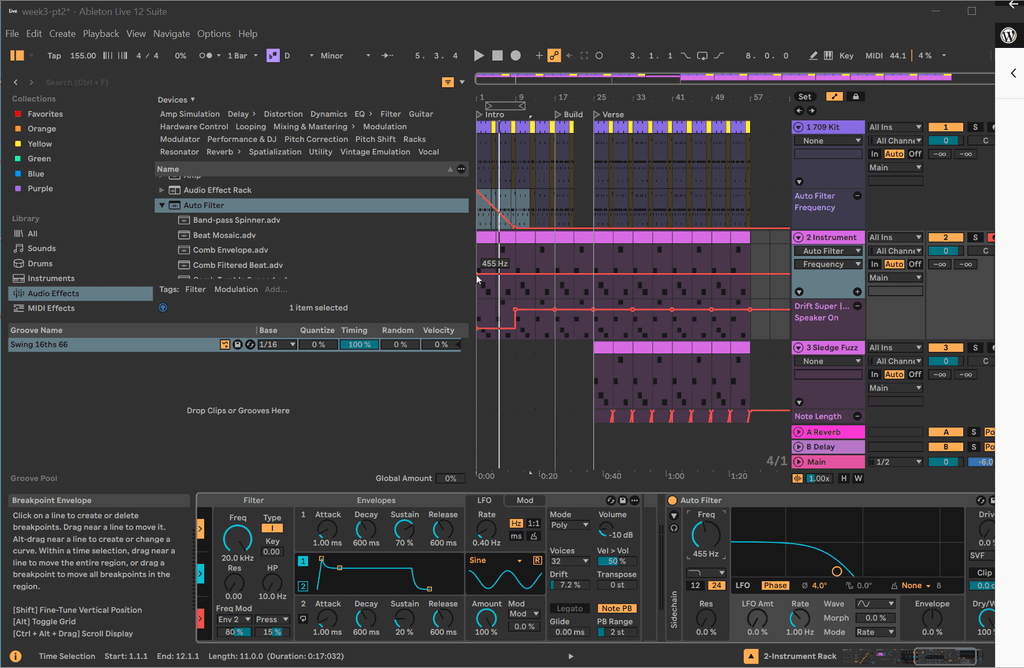
Now the saw will come in slowly and the drums will come in slowly together to make our intro section more… intro-y.
Next, we’ll need something to fill the space between where the build stops and we just have the saw sound on it’s own and where the Verse / drop section is. For this, we’ll take a Reverb and put it there:

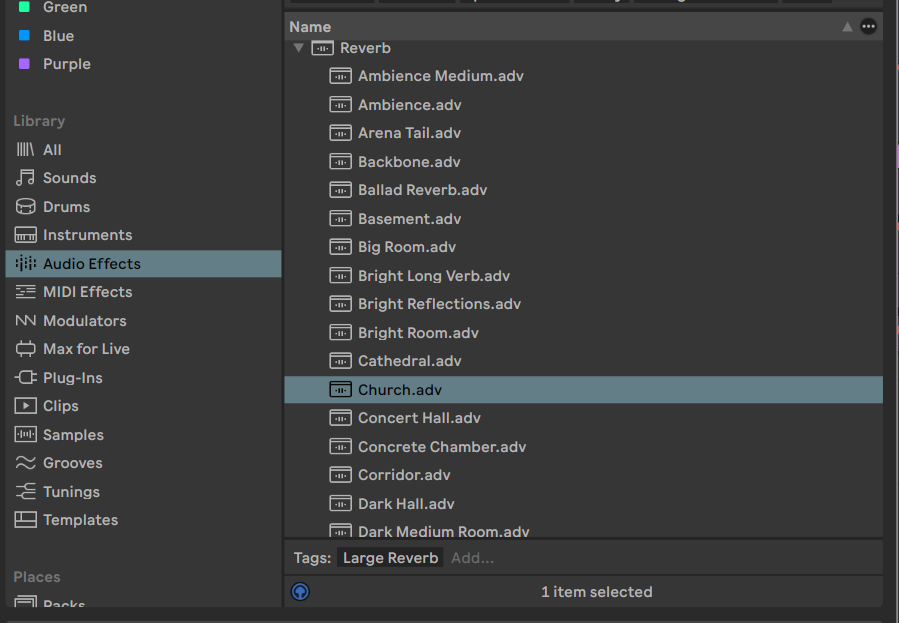
Reverb is an effect that makes sounds linger around because they’re filling a space or a chamber. I’ve auditioned this section a bit with the different reverb presets in Live and I like how the Large Space Chorus preset sounds. Drag the Large Space Chorus preset onto the saw effect and listen in that empty section to see how it makes you feel:

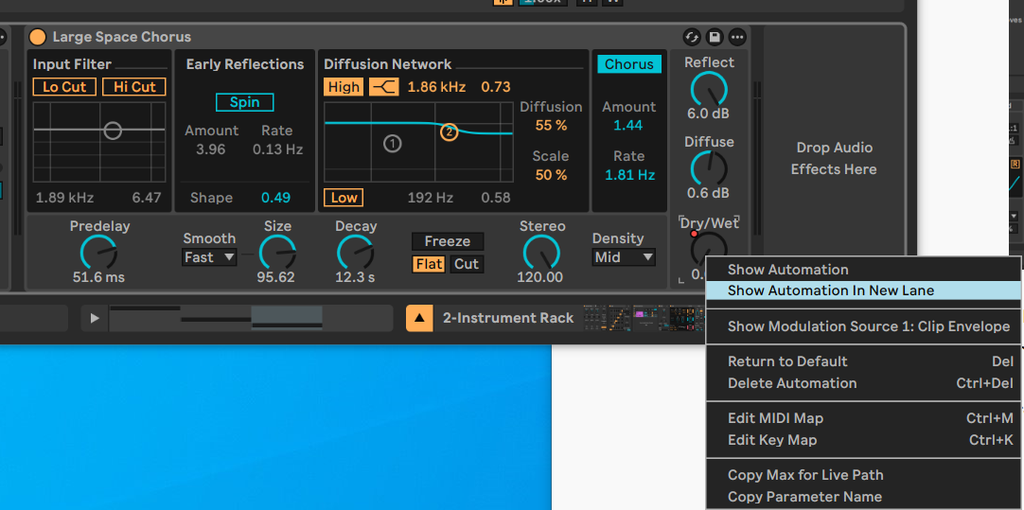
The reverb effect has a ton of parameters, mostly for getting different sounds and spaces from it, but for today, we’ll just worry about the dry/wet parameter. When an effect is set to DRY, the effect effectively off (not quite but close enough for now) – conversely when an effect is all the way WET the effect is exaggerated. We’ll use another automation to set the effect to DRY to start with and will then turn it up towards wet by the end of where notes are coming through in this empty section, then will set it back to dry before the Drop/Verse section comes in.
Right-click the dry/wet in the reverb and draw the automation from dry to wet and then back to dry:

The automation I ended up with looks like this:

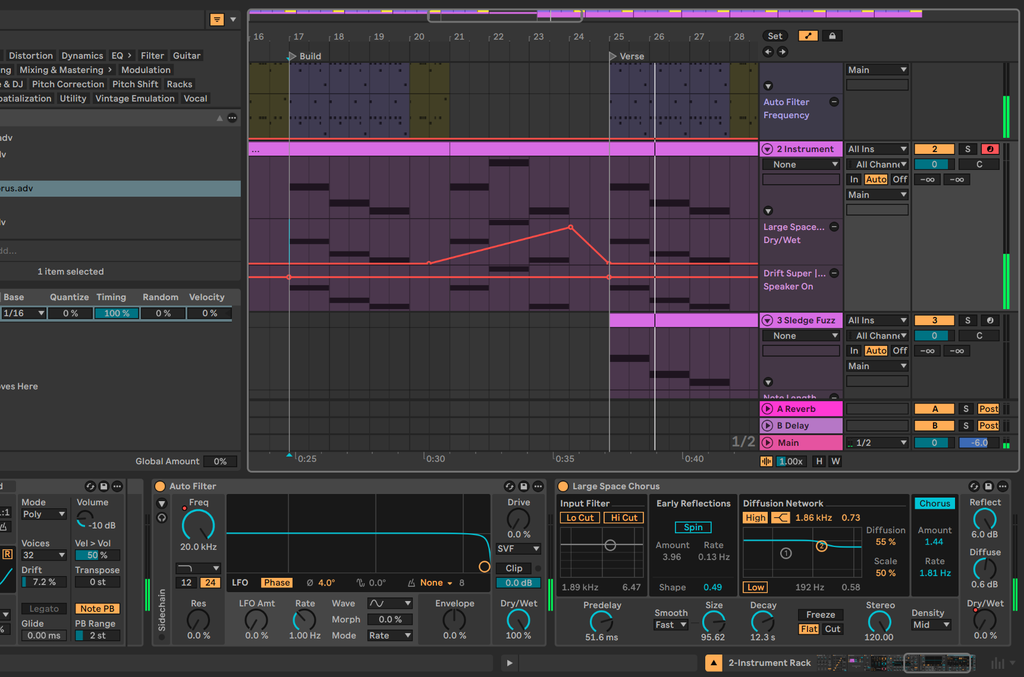
With the automation the reverb filled section sounds like this:
We’ll finish up our introduction to the audio devices by adding some variation on the fills in the verse section. Take the Beat Repeat device and add it to the drums, I’m just going to use the Squshy preset for now.

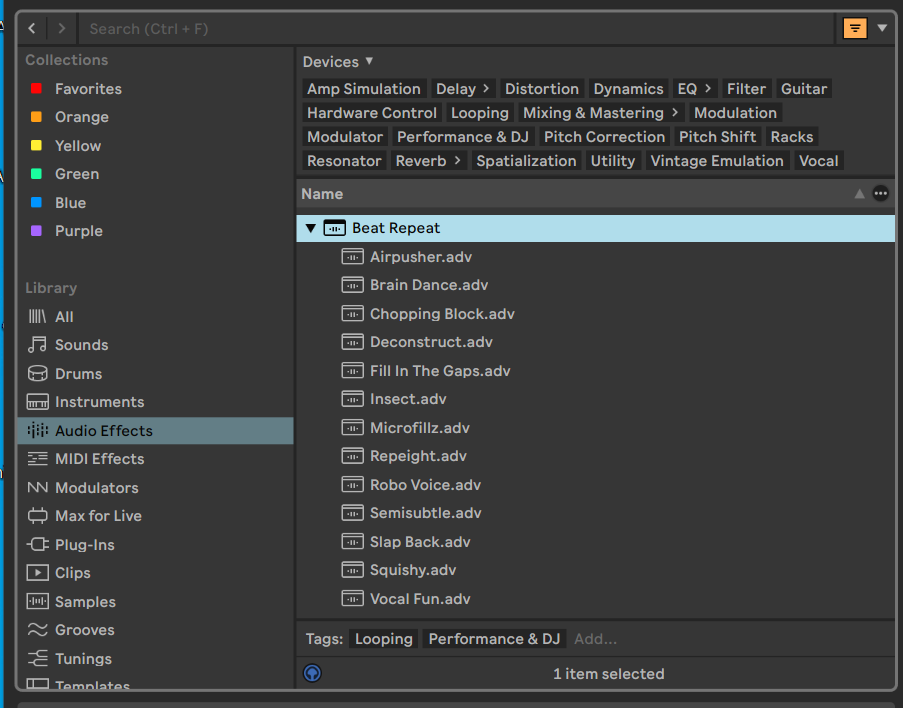
Right click the on/off button for the beat repeat effect and select show automation in new lane.


Then draw an automation that only turns on the beat repeat (squishy) device during the third drum section:

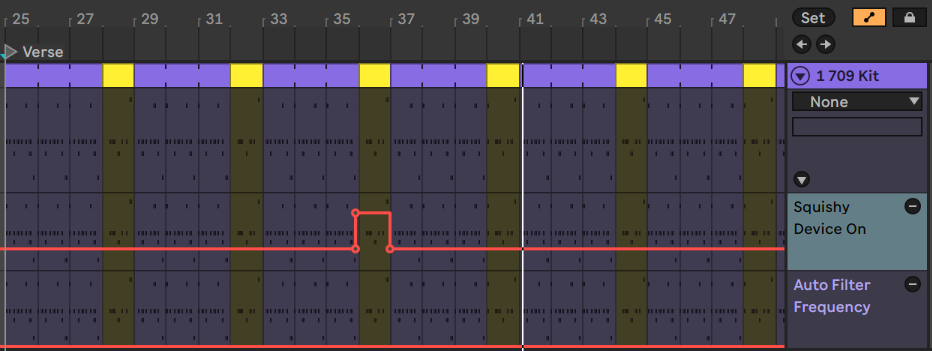
Finally, we’ll duplicate (ctrl+d) this automation so it also happens in the fourth section:

Note that I highlighted the four bars before pressing control+d with the four bars highlighted to duplicate the automation. I had set the device to be OFF at the beginning of the song and before and after the accented section so that it wouldn’t be activated the entire time. With this beat repeat variation, the new section sounds like this:
We can keep going and add another beat repeat to the final two 4-bar sections again for more variation:

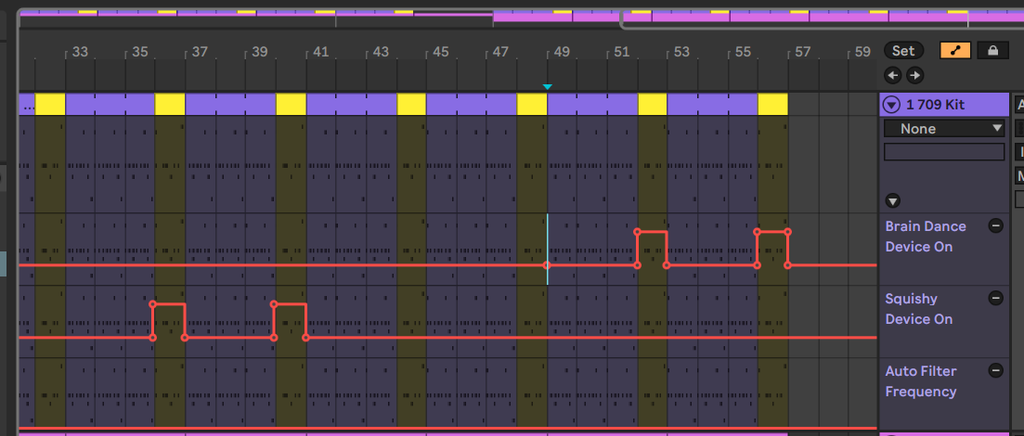
I chose the brain dance beat repeat preset, which makes the final sections sound like this:
We’ll turn off the automations now by pressing a and will add some sounds to add more spice to the track – press control t to add a new track near the drums, I like to call this track “dressing” – one of my teachers said that these kinds of sounds are like dressing on a salad, it makes the salad a lot tastier – note that I am labeling my tracks with a # before the track name, which Ableton Live fills with the number of the track, e.g. # Dressing, This way, if you move the tracks around the numbers stay up-to-date! Before we add some final “dressing” sounds the song looks like this:

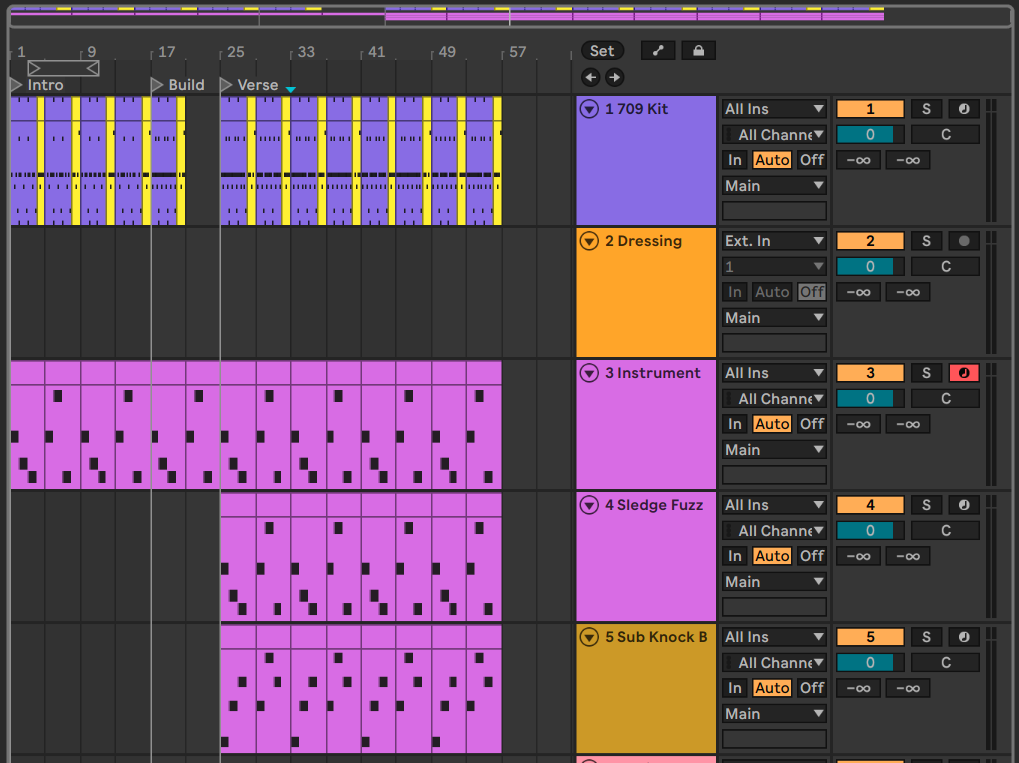
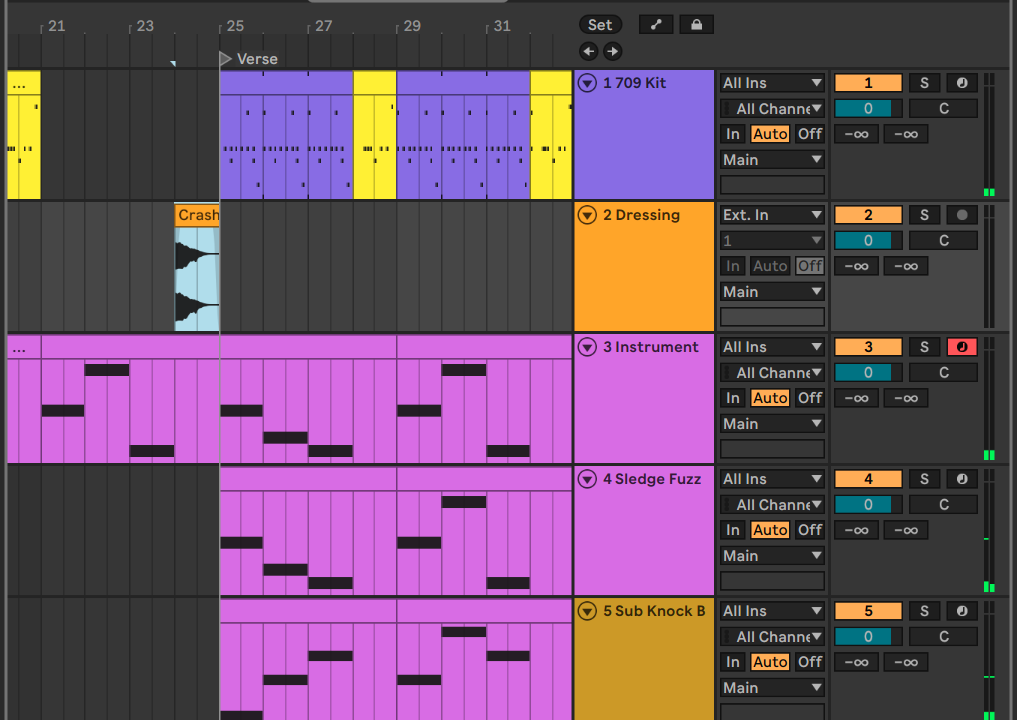
I’m going to dig around in the Singularities sounds and see if there’s anything cool we can add for some spice and flavor – OHHH, a crash! Take the Crash-RTO sound and add it to the empty space before the verse/drop section:

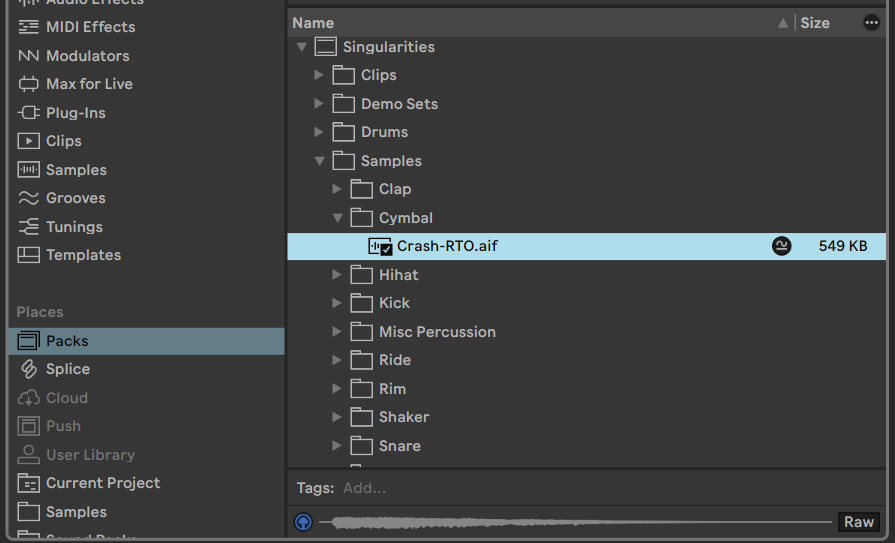

Now click on the crash and press r on your keyboard or right click it to reverse it.

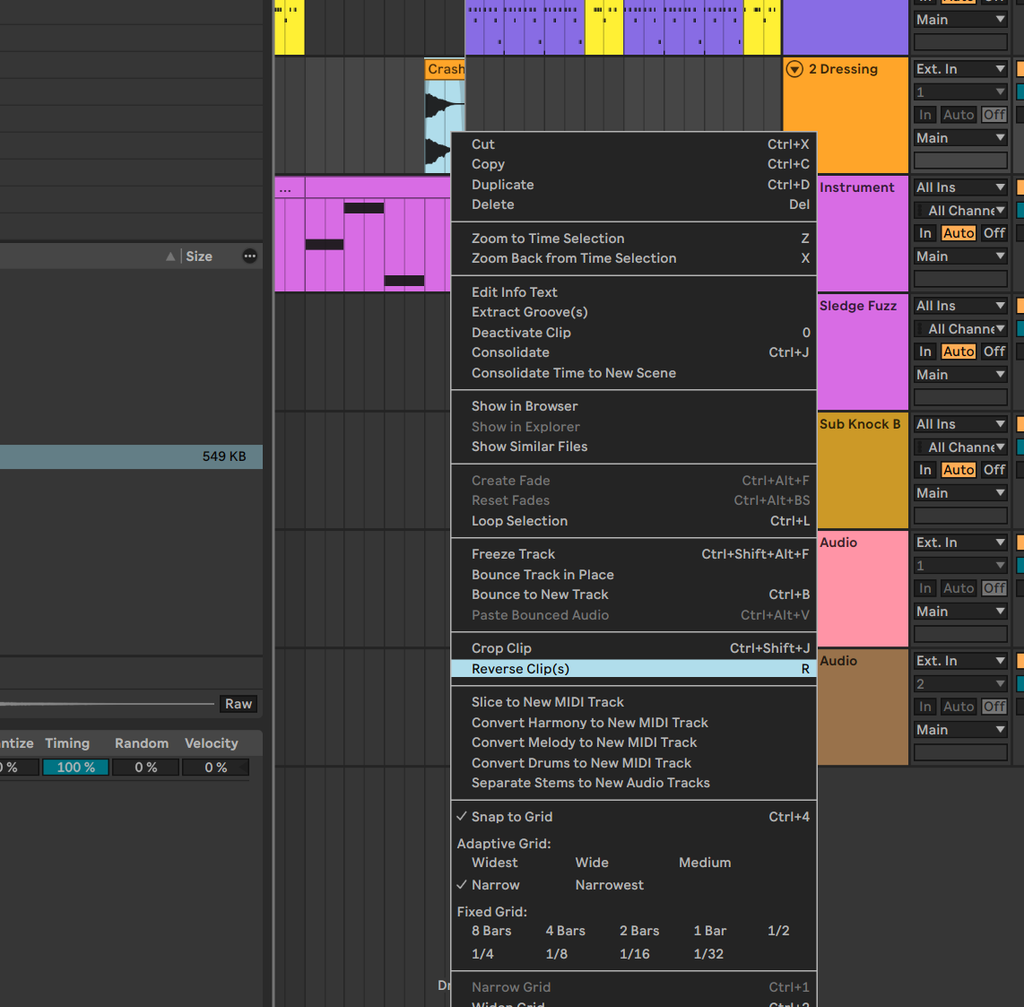
Now the reverse crash will improve the transition into the full beat drop:
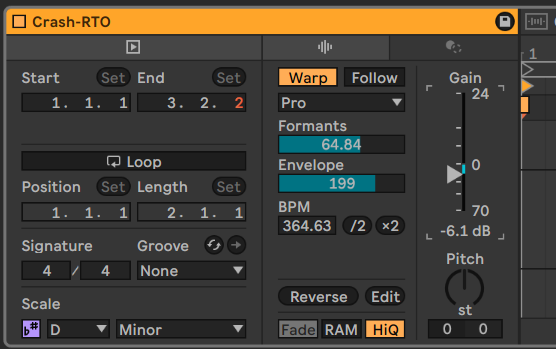
You might want to try stretching out this sound a little bit too, we’ll change warp mode to complex pro, turn down formants, and drag the sample while holding control+alt+shift, this is an awesome trick:

You’ll notice that the hand / pointer turns into a [ after you press control+alt+shift – that is your signal that you’re warp-stretching a sound. I adjusted the Formants and Envelope a little more and turned down the gain so the sound isn’t so “present” or loud in the mix:

For a finishing touch on getting this sounding a little better, we can fade out the stretched crash by dragging the corner of the audio clip:

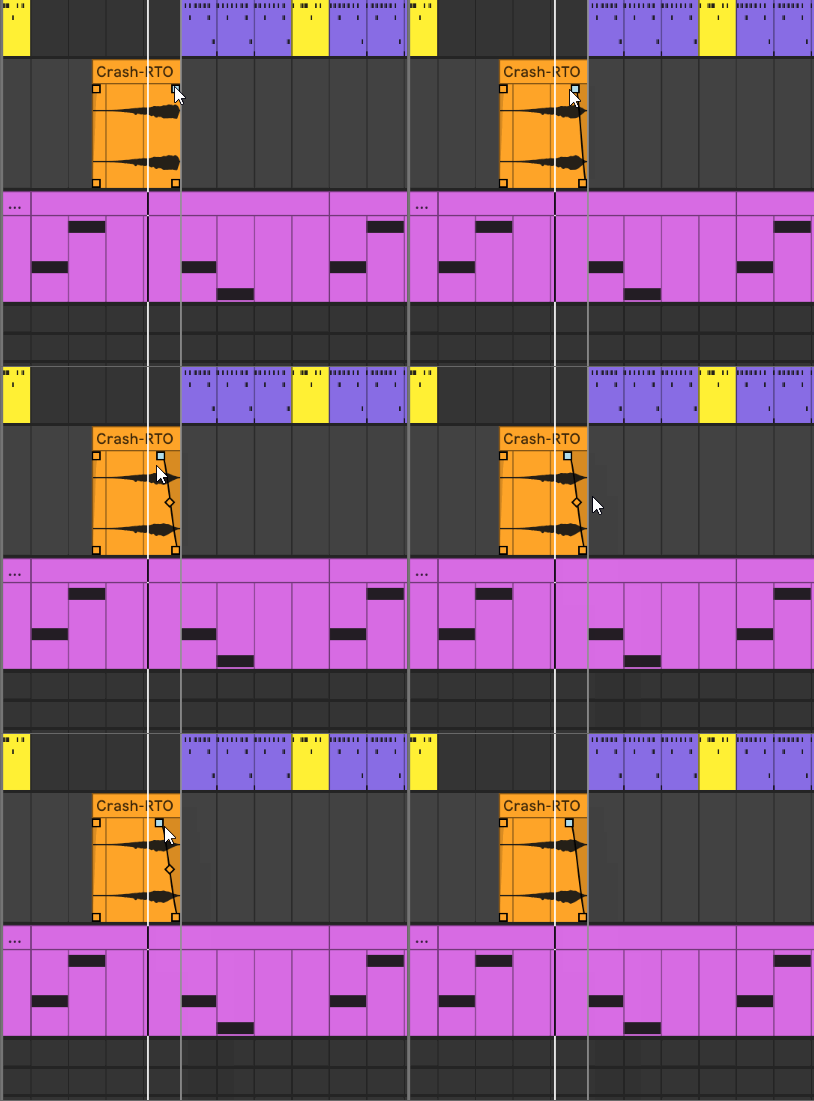
Now that sound will be a little longer and leave a little space (silence) for when the song comes back:
At this point, we’ve built a lot of sections of the track taking inspiration from my bootleg of Gold Dust. You’ll notice that we’re bringing in the drum and saw sounds similarly to how I did in the intro, we’re building variations in the end sections of the drum sections, and are using reverb to fill silent parts of the song with space.
Songs like the one I shared earlier are created just as we just did but with a lot more time spent coming back to the song and adding new ideas and taking away old ideas. Using automations to create different variations make the transitions between sections of the song smoother and can also keep a song interesting during longer sections that otherwise just repeat. Certain genres such as techno, trance, and house use this to more extreme effect and oftentimes just change a single element very gradually over a long time to create a slow building or rising effect in the song.
If you want the finished versions of the project files, here they are again:
Exercises and wrap-up
This week we learned about most of the devices that are provided in Ableton Live Intro:
- Midi – Arpeggiator, chord, scale, note length, and pitch
- Audio – Auto-filter, beat repeat, and reverb
With just these devices, you can do SOO much more than we did today. The devices combine together in really nice ways so don’t feel constrained to just use them as I showed you. A really great combination worth trying is using the auto-filter device with the reverb device: opening a filter and moving a reverb from wet to dry at the same time can create an effect that makes sounds seem like they’re starting far away and are getting closer. Also, all of the different types of filters are useful for transforming sounds in different ways and are worth experimenting with.
We also created our first automations! Automations are a really exciting part of making music because it allows you to control all of the knobs that are there, in creative ways. The more gradual and long your automations, the more polished your tracks will feel.
We also did a little synthesis with drift today but this is it’s own special area of music production that I’ll get into more deeply in a later tutorial.
With this lesson complete, there’s still plenty that you can explore until the next one, so while the learnings are fresh in your mind try the following exercises.
Exercise #1 – Explore the auto-filter with automations

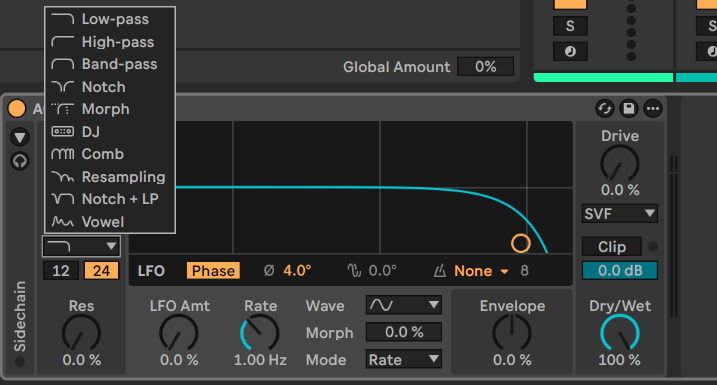
First, check out all of the different filter types. One easy way to do this is go back to the partial song we created and see what happens when you add an auto-filter to different parts of the song (probably the saw or the Sledge Fuzz instrument) with an automation that quickly changes the filter frequency.
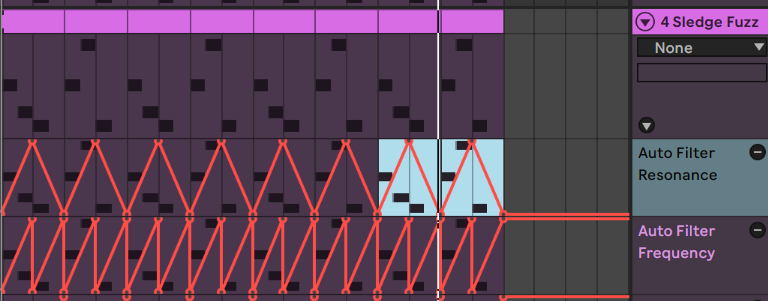
We didn’t even mess with the Resonance knob yet – resonance increases the volume at the peaks in the filter causing sweeping sounds. Try turning up and down the resonance on the sections that you’re automating the frequency. The resonance will have a really different effect for each of the different filter modes and you might discover a combination of the two that you really like. The following example shows an automation pattern that I built to check it out:

Finally, try moving the drive knob up and down in the same way as the resonance filter to see how that affects things. Here’s another automation example with drive, resonance, and filter all changing in ways that are interesting in different filter modes:

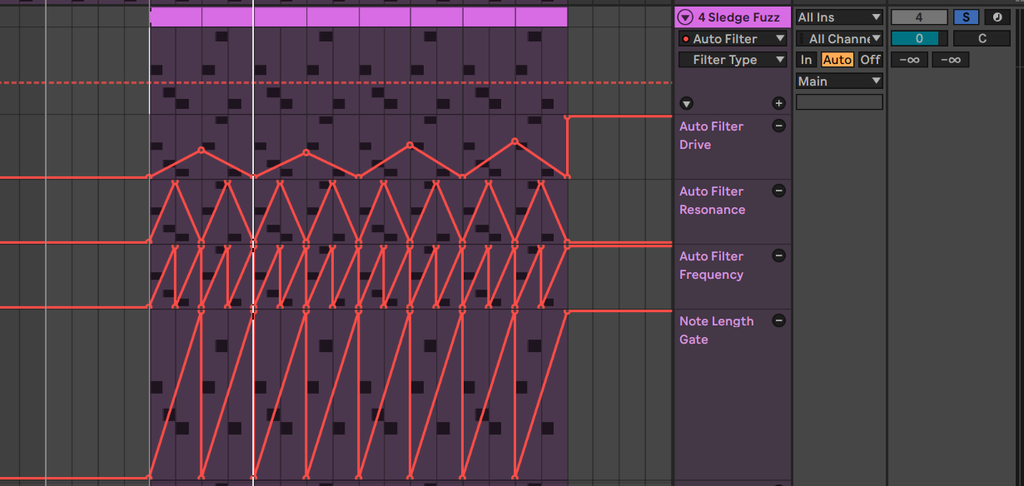
Here’s how it sounds with the filter set to vowel:
I also did another with the formant automated for some YOIs:


Exercise #2 – Make more transitions
Go back to the songs that you have created for Part 1 and Part 2 and try adding transitions between the sections of your songs. A little reverb or auto filter can really make a section land with more energy and make the drop sections feel more powerful.
Exercise #3 – Arpeggiator
The arpeggiator has a bunch of different modes:

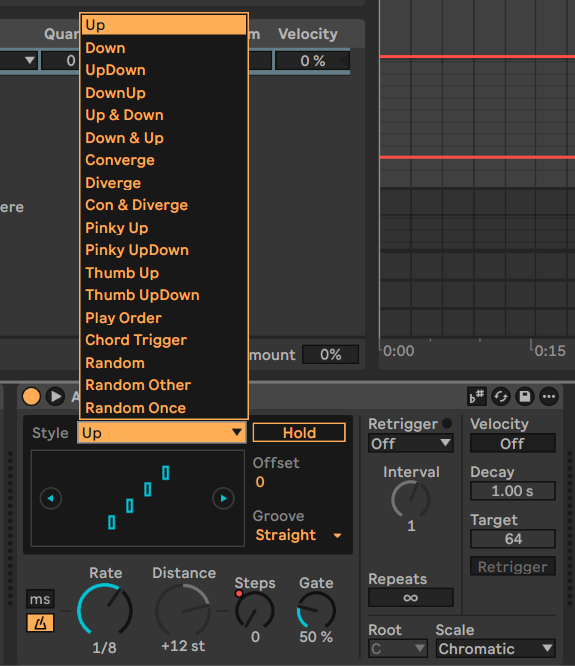
Try out the different arpeggiator modes and also try automating the arpeggiator mode to change for different sections. This can work well but also can sound a bit jarring – which again requires more transitions to make it work. Also try different rates in the arpeggiator and the gate – which changes the length of the notes that are played by the arp. Again, you can try automating the GATE parameter which is similar to automating the note length with the Note length midi effect.
Exercise #4 – Arrangement
Take some songs that you like and try to recreate the drum patterns and transitions from those songs. You’re welcome to do this in as much detail as you want to learn how to produce music in different genres but as mentioned before don’t copy songs and release them as your own. The drums typically define the song’s genre so if the examples I have been giving are not in the genre you are most excited to produce in, try starting from an arrangement of a song in that genre to getting the drum sequencing for that genre down before adding more layers on top. Pay attention to how the drums change in sections before transitions to signal the change to the listener (dancer).
After building some drum patterns for different sections of a song, make your own melodic layers and keep going until you have a more fleshed out song. Then finally go back and build transitions between the song sections using the effects as we did today. You’ll be surprised at how good of a beat you can make if you keep working on it!
If you have a sample library or access to Splice, try putting those samples in for transition sounds along with using the effects for even more smooth transitions.
References and resources
I learned all of this from my teachers and can not take credit for what I’m teaching. If you want to learn from the people who taught me, please check out the following masters curricula (in chronological order of when I discovered them):
For more learning resources, you can check out the Patreon pages for some folks I follow (in alphabetical order):
I’m presently unavailable for lessons, but you can try the Producer Dojo, Encanti, or Gravitas Create for facilitated options and my friend Cryptochronica is also providing lessons. If you know me, and I’m forgetting you’re offering lessons, let me know so I can add you.
For those following along, check back for the part 4 exercise.
Parts so far: